 Contact Us


In the following article, you will find a compact summary of all the important updates and also the changelog at the bottom of this article.
25.2 Features & Improvements
Hybrid Mode
Hybrid Mode Backup
Starting with PIXERA 25.2, you can now use a single server to act as a backup for either a Manager or Client machine. Before this feature, you would typically need a dedicated server to back up your Manager and another dedicated server to back up your Client.
However, while this new feature makes it possible to perform this workflow with just one backup server, you should already be extremely comfortable with Manager/Client workflows, Multi-User workflows, and Backup scenarios before attempting this, as it is only recommended for advanced users, and combines all three of these methodologies.
Methodology
Hybrid Mode combines the concepts of Manager Backup and Client Backup scenarios into a single workflow.
Remember, PIXERA is not just a media server software but a suite of softwares, including PIXERA, Presence, RX, and Control. Behind PIXERA's powerful GUI is PIXERA's powerful Render Engine (RX). Whether you are launching PIXERA or Presence, each of these softwares access the PIXERA Render Engine as a background process to offer you stunning visuals and sophisticated programming.
What that usually means is, either PIXERA is accessing the Render Engine OR Presence is. Now, within Hybrid Mode, PIXERA and Presence can run simultaneously on a single machine so that the PIXERA instance can access RX via Presence - like a Manager/Client workflow, just localized.
System Setup
Before we can set up our Backup scenarios properly, we first need a system in place in which to build off of. For this scenario we will use 3 servers - a Manager, a Client, and a Hybrid server to back up either the Manager or Client in the case of failure.
Using this article as a foundation, we will first build a basic Manager/Client system using two of the servers, ensuring we also have implemented the steps below.
- Ensure both servers are on a dedicated PIXERA network (confirm the two servers can ping each other)
- Launch Presence on the Client machine (ensuring the Adapter IP is set to the network in the above step, which should match the Manager's Discovery Adapter)
- Create a new PIXERA project on the Manager machine
- Set the Discovery Adapter to the network adapter used above (may require restart)
- Add two Displays
- Name one “Manager” and the other “Client”
- “Start” the Client machine via the Mapping tab
- Now, you should see two systems with green icons - "Local" and your Client (Here, PX2-21049)
- Assign one of your Local (Manager) outputs to the Manager screen and one of the Client's outputs to the Client screen
- Then, Activate both outputs
- Add at least two pieces of content to a Timeline
- Assign one piece of content to the Manager display and the other to the Client display
- Ensure you are seeing content play out from each machine before moving forward

Manager Backup
On the third machine (soon-to-be Hybrid machine), using the same PIXERA version as the other machines, join the Manager in a Multi-User session. We will refer to this third machine, for now, as the Backup Manager and the other as the Main Manager. Once properly setup, this Backup Manager will be called the Hybrid Backup.
Referring to this article as a foundation, ensure the Backup Manager's Multi-User and Backup settings are as follows:

Treat Closed Members As Lost means that when the Backup Manager notices another server in the Multi-User session disappear (either by closing PIXERA's engine or due to loss of communication), it will consider this as a Multi-User Member failing or becoming lost. In this case, when the Main Manager disconnects, it will be registered as the Lost Member.
Automatically Activate Local Outputs When Member Lost means when the Backup Manager registers a Lost Member (as noted above), it will assume responsibility for outputting that Lost Member's local outputs. So if the Main Manager was outputting content via it's GPU, now the Backup Manager will output that same content from it's local GPU.
Automatically Take Over Clients From Lost Members means when the Backup Manager registers a Lost Member (again, as noted above), it will also assume responsibility for controlling playback of that Lost Member's Clients. In this scenario, where the Main Manager disconnects, the Backup Manager would takeover playback control of the Client machine that was once controlled by the Main Manager.
Client Backup
Now, here's where the Backup Manager becomes the Hybrid Backup.
Remember, instead of PIXERA accessing the Render Engine directly, for Hybrid to work, PIXERA needs to access the Render Engine via a local instance of Presence. To do this, on the Backup Manager, navigate to Settings > Discovery and turn on “Use Presence For Local Live System.” Then, restart PIXERA.

Once PIXERA has restarted on the Backup Manager, open Hub on that same machine and click the cog icon next to the PIXERA version you are using. Select “Start Presence.”

To confirm this machine is available as a potential Hybrid Backup, on your Main Manager, check to see that the Backup Manager is listed as a Live System under the Mapping tab. Select that System and start it's Engine.

To officially make our Backup Manager the Hybrid Backup, we need to follow a Backup scenario, assigning the Backup Manager/Hybrid Backup as a Backup for the Client machine. For this scenario, we will keep it as simple as possible but the article linked above can be followed for more advanced options.
To make this assignment, either from the Main Manager or Backup Manager, select the Client machine under Mapping > Live.
Then, in the Inspector window on the right, find the entry box titled “Usage” and give this Client machine a Usage Preset by typing in a name and then selecting “Update.” This stores the Client's Live System configuration as a Usage Preset, which will be set up in the next step to transfer to the Hybrid Backup in case of Client Engine/communication loss.

Continuing downward in the Client's Inspector, find the “Backup” menu and twirl down it's options.
Populate the “Backup IP” entry box with the IP address of the Backup Manager/Hybrid Backup. Then, set the Usage Transfer Mode to “Copy,” and then select “Configure Transfer.” Doing so will copy the Client's Usage Preset over to the Hybrid Backup in the event of the Backup being triggered.
The Backup Manager has now officially become the Hybrid Backup!

Testing
The most important part of using PIXERA's Backup features is ensuring they work as intended! Please always test your backup system before relying on it for a production.
To test that the Hybrid Backup takes over for the Main Manager, close the Main Manager's PIXERA GUI or “Close” the Main Manager's Engine. If setup properly, the following will happen:
- Hybrid Backup machine will takeover playback of the content from the “Manager” screen, which was outputting locally from the Main Manager, now outputting locally from the Hybrid Backup's outputs
- The Client machine will continue outputting content from the “Client” screen, which was receiving playback commands from the Main Manager, but is now receiving playback commands from the Hybrid Backup. Pause the Timeline from the Hybrid Backup and ensure the content on the Client pauses as well
Once successfully tested, re-open the PIXERA project on the Main Manager and reconnect to the Multi-User session.
You will notice that the Hybrid Backup still has priority over playback control of the project. To regain control on the Main Manager, you can start, or restart, the Hybrid Backup's Engine and Client's Engine via the Mapping Tab > Live systems tab from the Main Manager. You will be prompted with a pop-up informing you that you are “taking the engine” from the Hybrid Backup/other Manager and asking if you'd like to continue - select “Yes.” Doing so will give the Main Manager playback control again. Now we are back to normal and can test our Client backup.

To test that the Hybrid Backup takes over for the Client, we can perform the same “mock” failure of the Client as we did for the Main Manager - closing it's Engine, disconnecting the Client from the network, or selecting “Trigger Backup.” In doing so:
- The Hybrid Backup machine will takeover playback of the content from the “Client” screen and will output this content from the Hybrid Backup's local outputs. Playback control will still be coming from the Main Manager
Congratulations! You have successfully setup a PIXERA Hybrid Backup system.
Going Further
If you are interested in taking this a step further, or configuring a larger network of servers, please have a look at these articles:
PIXERA 25.2 | 15. September 2025 | R.J.
Video Free Run with internal Loop
Inner Loop
Inner Loop is a new feature to 25.2 that allows users to program a clip to have a specific section of the clip (set by Free Loop Inpoint and Free Loop Outpoint) repeat, while still having unique sections before and/or after the clip.
Activating Inner Loop-Timeline Based
When using this feature on the timeline it is important to note that clips with Inner loop should not be used with other clips that are meant to be locked to time. This is because when the Nowpointer is running, a looping clip needs to be long enough to remain visible even after the outro is triggered (via a pause cue, explained below). After the Pause Cue, the clip needs to have its duration be at least loop duration + outro duration to ensure the outro animation plays fully. This can cause issues when running into clips that must be locked to time.
In order to activate the Inner Loop feature, you first must set your clip play mode to: Free Loop
For more info on Play Modes please see: Play Modes
From there you can set your Loop points under the Clip Timing Properties in the Inspector:

Inpoint: When the nowpointer enters the clip, this will be the starting time of the resource that is playing
Free Loop Inpoint: The “Inner Loop” in point, where the resource will loop back to once it hits the Free Loop Outpoint
Free Loop Outpoint: The “Inner Loop” out point, where the resource will loop back to the Free Loop Inpoint
Outpoint: Where the resource will end once you “exit” the inner loop
Clip Size
Make sure that your clip is long enough to accommodate the outro, otherwise your clip may end before the end of the resource playing.
Exiting the inner loop-Timeline Based
To exit the Inner loop on the Timeline you can use a Pause cue that has “Trigger Inner Loop Outro on Leave” checked


Workflow Recommendation
Say we have an event with a fixed sequence of clips, and each clip has an intro/loop/outro. Here we would recommend keeping the looping clips short and always adding two Pause Cues:
– One in the middle of the clip to exit the loop (using “Trigger Inner Loop Outro on Leave”
– Another on the last frame, directly before the next clip
Directly after the clip comes the next clip. When the loop is exited, the Nowpointer automatically runs into the second Pause Cue. The resource then has as much time as needed to fully finish, and the operator can start the next clip once the outro animation is completed.


PIXERA 25.2 | 14. August 2025 | MB
Layer Groups
Layer Groups
Layer Groups is a 25.2 feature that allows the user to group layers together in order to more easily manage their timeline organization.
Note
As of version 25.2, this is strictly for Timeline organization. There is not yet a way to move layers in renderspace together, or apply effects to a layer group.
Warning
Layer groups have an impact on the API structure and must be taken into account in the Instance Path
Create a Layer Group
To create a layer group, right click in the layer heading and then select ‘Add Group’, or click on the ‘Add Layer’ Icon in the Timeline Tool bar and select ‘Add Group’

Add Layers to Group
You can add a layer to the group in a couple of ways:
1- Click and drag a layer (or layers) into the created Group

2- Right click into the Group in the Layer header and ‘Add Layer to Group’

Group Multiple Layers
You can Group Multiple Layers together by shift or control selecting layers in the Layer Header, then right clicking in the header and selecting ‘Group Layers’

Group Inspector
You can rename a group by selecting the group and renaming it in the Inspector. You can also change the color of the group here

Moving Groups on the Timeline
You can select the group in the timeline to move all the clips in the group together. If you select a Clip within the group and move it, it will separate out the Group selection in the Timeline.

PIXERA 25.2 | 24. July 2025 | MB
Masks in Composting
Masks in Compositing
Quick Overview

Create Mask
Via the context menu, you can go to “Add Resource" and select “Mask”

this will create a new mask resource in you selected directory,
This can be used like any other Resource in PIXERA, as default it contains a square Mask element.

This mask resource can now directly be used in a container on a timeline or in the Mask effect, See → Mask RGB Effect
To use this mask element and to behave with the expected behavior of a mask, you need to set the clip or layer where it is assigned to, to Blending→Mode→Multiply

possible alternative of this is to set the background color to alpha:


Modify Mask
Resource Resolution
After the mask is defined in a resource, it must also include a resolution.

The size defined here specifies the dimensions of the element on the layer and is used for scaling in cases where different aspect ratios are applied. Subsequently, all layer parameters refer to the rectangular dimensions defined by this resource resolution.
Mask Element
A Mask Resource can contain multiple Mask Elements
These can be edited within the inner compositing.

After selecting the resource, the Mask points can be edited.

Background Color
Specifies the background color of the mask. By default, it is white, but an alpha value (transparency) can also be configured.
Mask Color
Allows adjustment of the mask color. When 'multiply' is selected as the blending mode, this enables easy creation of a colored highlight over the area.

Invert Mask
To invert the Mask, you can set the Background Color to Black, and the Mask Color to White.


Use Mask in Sampler
The mask generated in Pixera can be loaded directly into the sampler in FX.

Limitations
Currently, it is not possible to animate the mask points, but It is possible to animate the movement of the Mask Resource.
Export and Transfer of the Mask resource is currently not possible.
PIXERA 25.2 INTER 30 | 22. July 2025 | J.B.
Real Time Color Correction
Real Time Color Correction for Screens, LED's and Displays
Projectors, Displays and LED's can have color correction applied via a LUT. It is also possible to update a Screen's color correction in real time, this includes having a brightness value be changeable per display.
The feature can be found in the Mapping tab by clicking on the Displays and LED's in the workspace. To color correct Projection Screens, you need to instead select the Projectors being used.
In the Inspector's Setup tab, you can find the Color Correction Real Time folder.

Adjust the settings as needed. The Eye will mute and unmute the settings applied from a Parameter. The Reset icon will bring back that Parameter to its default state.
Below the Color Correction Real Time settings, you can find the DMX Patch settings for the real time color correction.

Auto patch will patch all the Parameters to the next available Universe/Channel. Patch Screen will open the DMX Patch window, as described in detail in this article.
API/Control
New API calls are available starting from 25.2 R 3 allowing the Color Correction Real Time values to be changed from outside calls or from Control.
These calls include:
Pixera.Screens.Screen.resetAllColorCorrections()Pixera.Screens.Screen.setColorCorrectionWithPath(string path,float value)Pixera.Screens.Screen.getColorCorrectionWithPath(string path)Pixera.Screens.Screen.setColorCorrectionAsJsonString(string colorCorrection)Pixera.Screens.Screen.getColorCorrectionAsJsonString()Pixera.Projectors.Projector.resetAllColorCorrections()Pixera.Projectors.Projector.setColorCorrectionWithPath(string path,float value)Pixera.Projectors.Projector.getColorCorrectionWithPath(string path)Pixera.Projectors.Projector.setColorCorrectionAsJsonString(string colorCorrection)Pixera.Projectors.Projector.getColorCorrectionAsJsonString()
If setting the color correction, the path calls are aimed for easier programming usage, although they are less flexible being able to only change one Parameter at a time. The JSON calls are more complicated to program, however they are able to change as many Parameters as desired at once.

RealTimeColorCorrection is an example Module that can be downloaded to see how the set with path call works from Control, it can also be used in itself to Control the settings as a working Module with a UI of Sliders to change the values.

Troubleshooting
- Color correction is not available/Color correction real time is not available.

If real-time color correction is displayed as unavailable, then the Display/Projector must first be assigned an Output.
Pixera 25.2 R 3 | 20 October 2025 | O.K./C.L
CUE CSV Import/Export
Import/Export Cues via CSV
How to import/export cues via CSV
Import/Export all cues from a timeline
Create and edit cue lists in Excel, Google Sheets and Reaper.
Timeline Inspector
The inspector > Cues setting has been extended with two buttons: Import Cues and Export Cues.

Export Cues
If you click the Export Cues button, you will get asked which Cue Values you want to export. “Basic” and “All” is available. The "All" setting will export every parameter of the cues while "Basic" holds a limited set of parameters:
Basic:
Cue Number
Time (ss:ms)
Label
Note
Color
Operation
Is Active
Timeline Name
Timeline ID
All:
Cue Number
Time (ss:ms)
Label
Note
Color
Operation
Is Active
Wait Duration (ss:ms)
Spontaneous
Triggers Inner Loop Outro On Leave
Exclude From Cue Lists And Countdown
Jump Mode
Jump Goal (ss:ms)
Jump Fade Duration
Timeline To Trigger
Timeline To Trigger ID
Timeline Trigger TriggerMode
Timeline Trigger TimeMode
Timeline Trigger Goal
Timeline Trigger Fade Duration
Timeline Trigger Show
Network Cmd Api Output
Network Cmd Data
Timeline Name
Timeline ID
Import Cues
A pop-up will appear on clicking the import cues button.

Mode asks you if you want to merge the CSV with your current cues on the timeline.
Replace will remove all existing cues first.
Merge will add the imported cues to all existing cues.
Merging on cue import allows double entries of cue numbers
If you choose to merge the imported cues to existing cues, PIXERA will not double-check if cue IDs etc are doubled.If in doubt, select Replace!
Destination lets you choose the destination timeline.

Current Timeline: the one you have currently selected and pressed import cues in the inspector
Original Timeline (skip if not existent): the timeline that is specified inside the CSV. WIll be skipped if it is non-existent.
Original Timeline
Workflows/tips:
Google or your favorite AI will gladly create a breakdown of the best possible way to open and convert CSV files in Google Sheets, Excel or Apple Numbers.
Great prompts:
how to open a CSV with Google sheets
how to open and convert a CSV with Excel
Besides the usual suspects, there are countless other CSV Viewers/Editors that can be found online.
Reaper
Reaper will only export CSVs to Pixera. Currently, we have no option to generate a CSV that fits the Reaper import standard.
GrandMA
Currently, we have no option to export our Cue list to GrandMA consoles. Only import into PIXERA is supported.
Reaper Setup (Generated with AI)
To export markers from Reaper, navigate to the Marker/Region Manager, export the markers to a file (e.g., CSV), and then import the file into the desired application. Specifically, set the timeline to HH:MM:SS:FF, open the Marker/Region Manager, right-click inside the window, select "Export regions/markers...", choose a file format (like CSV), and save the file.
Here's a more detailed breakdown:
Set Reaper Timeline to HH:MM:SS:FF
Do this on the top of the Reaper Timeline. Right-click on the top of the ruler area.
The Markers must reflect the HH:MM:SS:FF structure.


Setting the Reaper Timeline FPS
Go to “File”, select “Project settings”.
In the pop-up window, select “Video”. Now choose your frame rate.

PIXERA 25.2 INTER 47 | 04 September 2025 | OK
Unreal 5.6 Implementation
Unreal Engine (5.2.1) Setup
Note
This article was written and uses Unreal 5.2.1 for its examples and descriptions. To find all supported versions, please visit this article: Supported Unreal Engine Versions
To download the latest files for each supported version, please visit our downloads page: Pixera Downloads
Disclaimer
Virtual Production is a complex topic. It is mandatory to understand the basic setup to be able to advance to the advanced techniques (For example, Set Extension and Multi-Pos warp).
Furthermore, it is mandatory to understand all the basic principles of PIXERA.
Here is a list of the essential VP related documentation in chronological order:
Unreal 5.2.1 Tips and Tricks (Performance and Testing)
PIXERA Connect, an Unreal Plugin - General Usage
PIXERA Texture Sharing to Unreal
Studio Camera (Virtual Production)
Set Extension (Virtual Production)
Introduction
Starting with PIXERA 2.0, Unreal Engine 5.2.1 can be used as a resource in the compositing tab.
Prior to starting the setup, please check the following prerequisites:
-
Unreal Engine (compositing resource) only works with a Server License or official PIXERA Servers
-
Unreal Engine 4.27 is NOT working with PIXERA 2.0.
- In case you are currently working with an Unreal 4.27 Setup please follow the official Epic migration guide:
-
Unreal Engine 5 Migration Guide | Unreal Engine 5.0 Documentation
-
Unreal is extremely demanding. We recommend using a dedicated powerful director as well as a playout server (e.g. PIXERA 4RS. In case of a homebrew, we recommend using a RTX A6000)
-
Download Unreal from the EPIC Games store from this URL: Epic Games Store DOWNLOAD
-
Install the .NET 4.8 SDK. .NET is a Microsoft platform used to build and run applications. It is open-source, free, secure, reliable, and high-performance. .NET is required when installing and using Unreal.
- Optional for Packaged Projects:
- Install Visual Studio including following Options (only necessary if you want to package a project):
- Add Game development with C++ (under Workloads) and following options:
- C++ profiling tools
- C++ Address Sanitizer
- Add Game development with C++ (under Workloads) and following options:
- Windows 10 SDK (10.0.18362 or newer)
- Install Visual Studio including following Options (only necessary if you want to package a project):
Unreal Engine Installation Guide
Create an account or log in with an existing account. Navigate to the Unreal Tab and install the correct build version, 5.2.1:
Warning
Sometimes the selection bugs, therefore it is necessary to install the wrong version first to access 5.2.1. Simply hit install and abort immediately
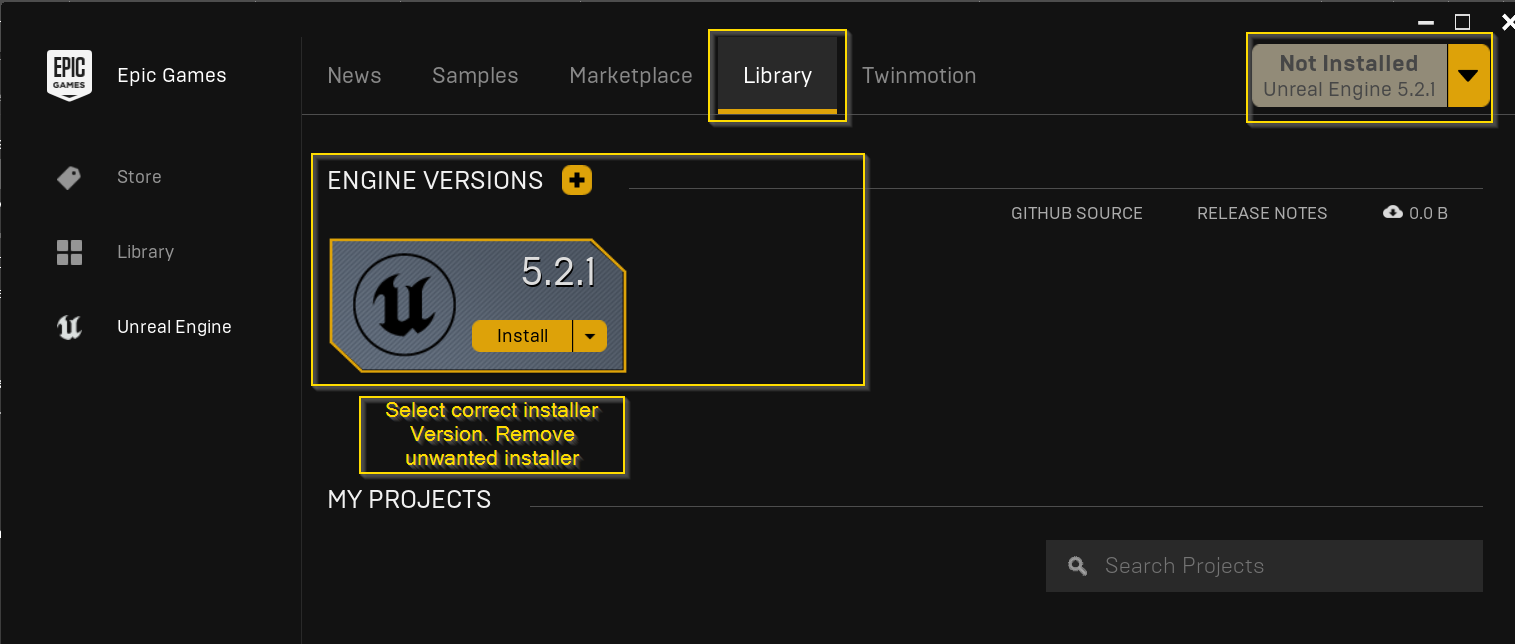
Uninstall unwanted versions by choosing remove.

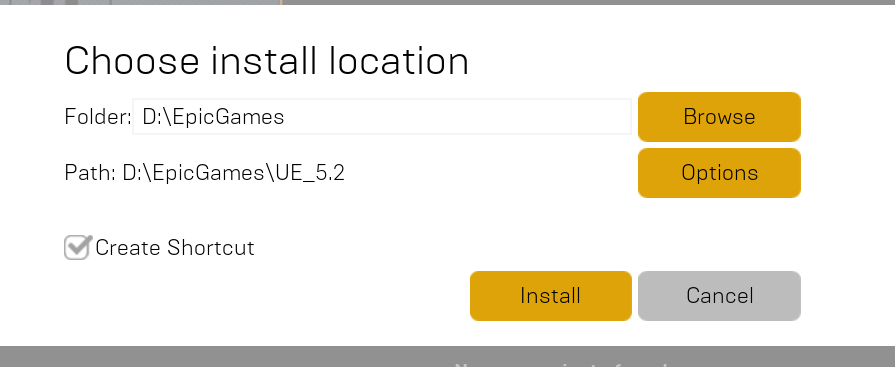
Warning
Install Epic Games and Unreal Engine on the D - Drive. When installed on the C - Drive, PIXERA might not be able to access certain files. Furthermore, after a reimage of the system, the installed files will still be accessible.
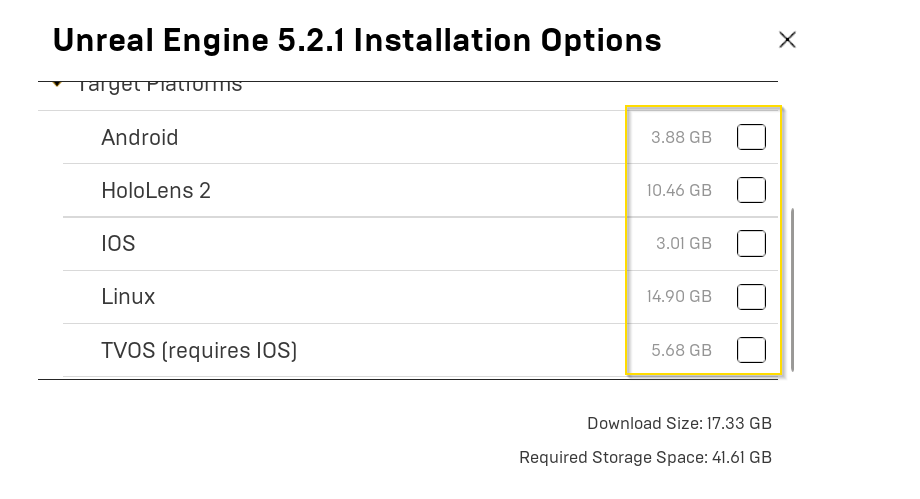
Go to options and change the install options:
Unreal Engine Setup
New Project
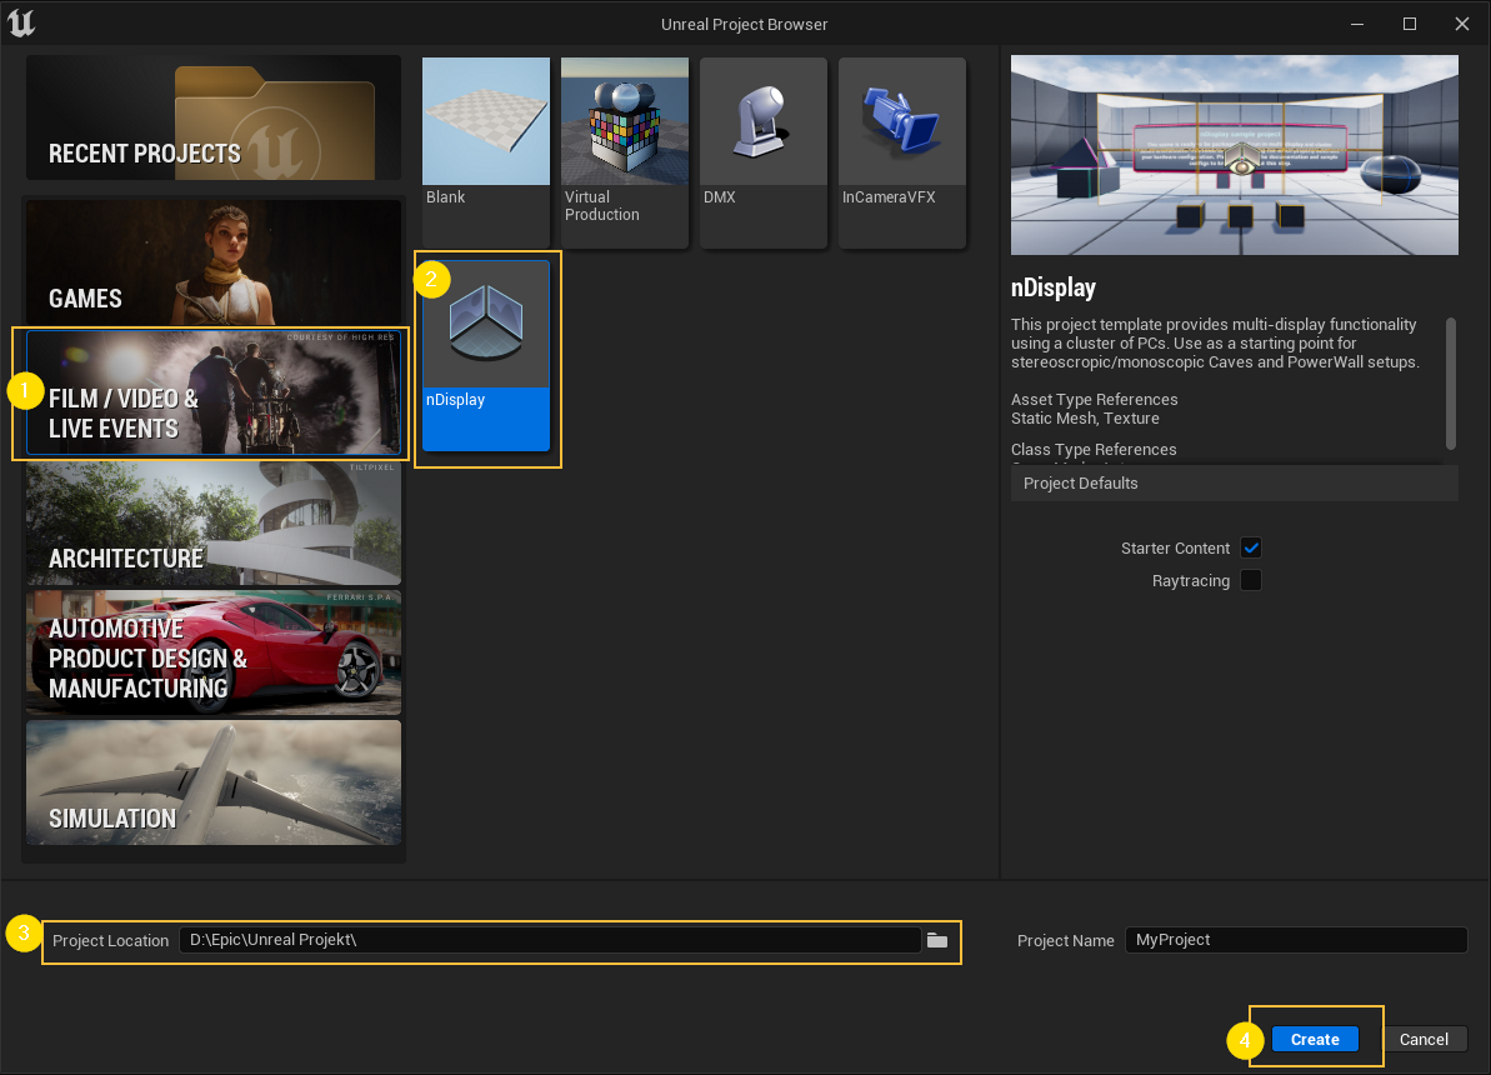
Start Unreal Engine via the Epic Games launcher. In the welcome menu, select Film / Video & Live Events and open the default nDisplay project:
1: Select Film / Video Live Events
2: Select the nDisplay project
3: Warning: define the correct project location. We recommend choosing the same drive as the installation path.
4: Create project
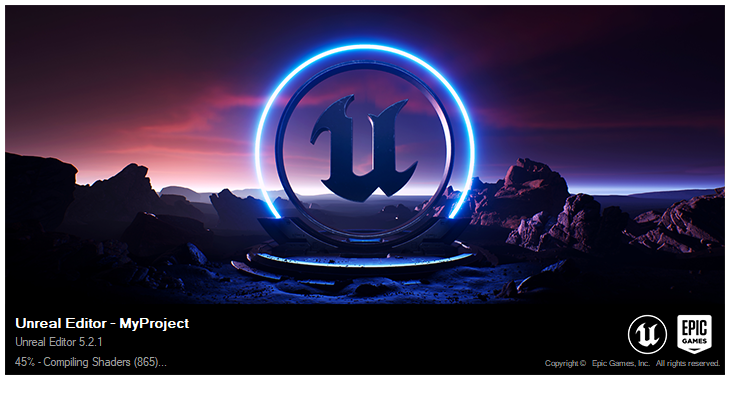
Warning
Start once and compile shaders:
Created Project
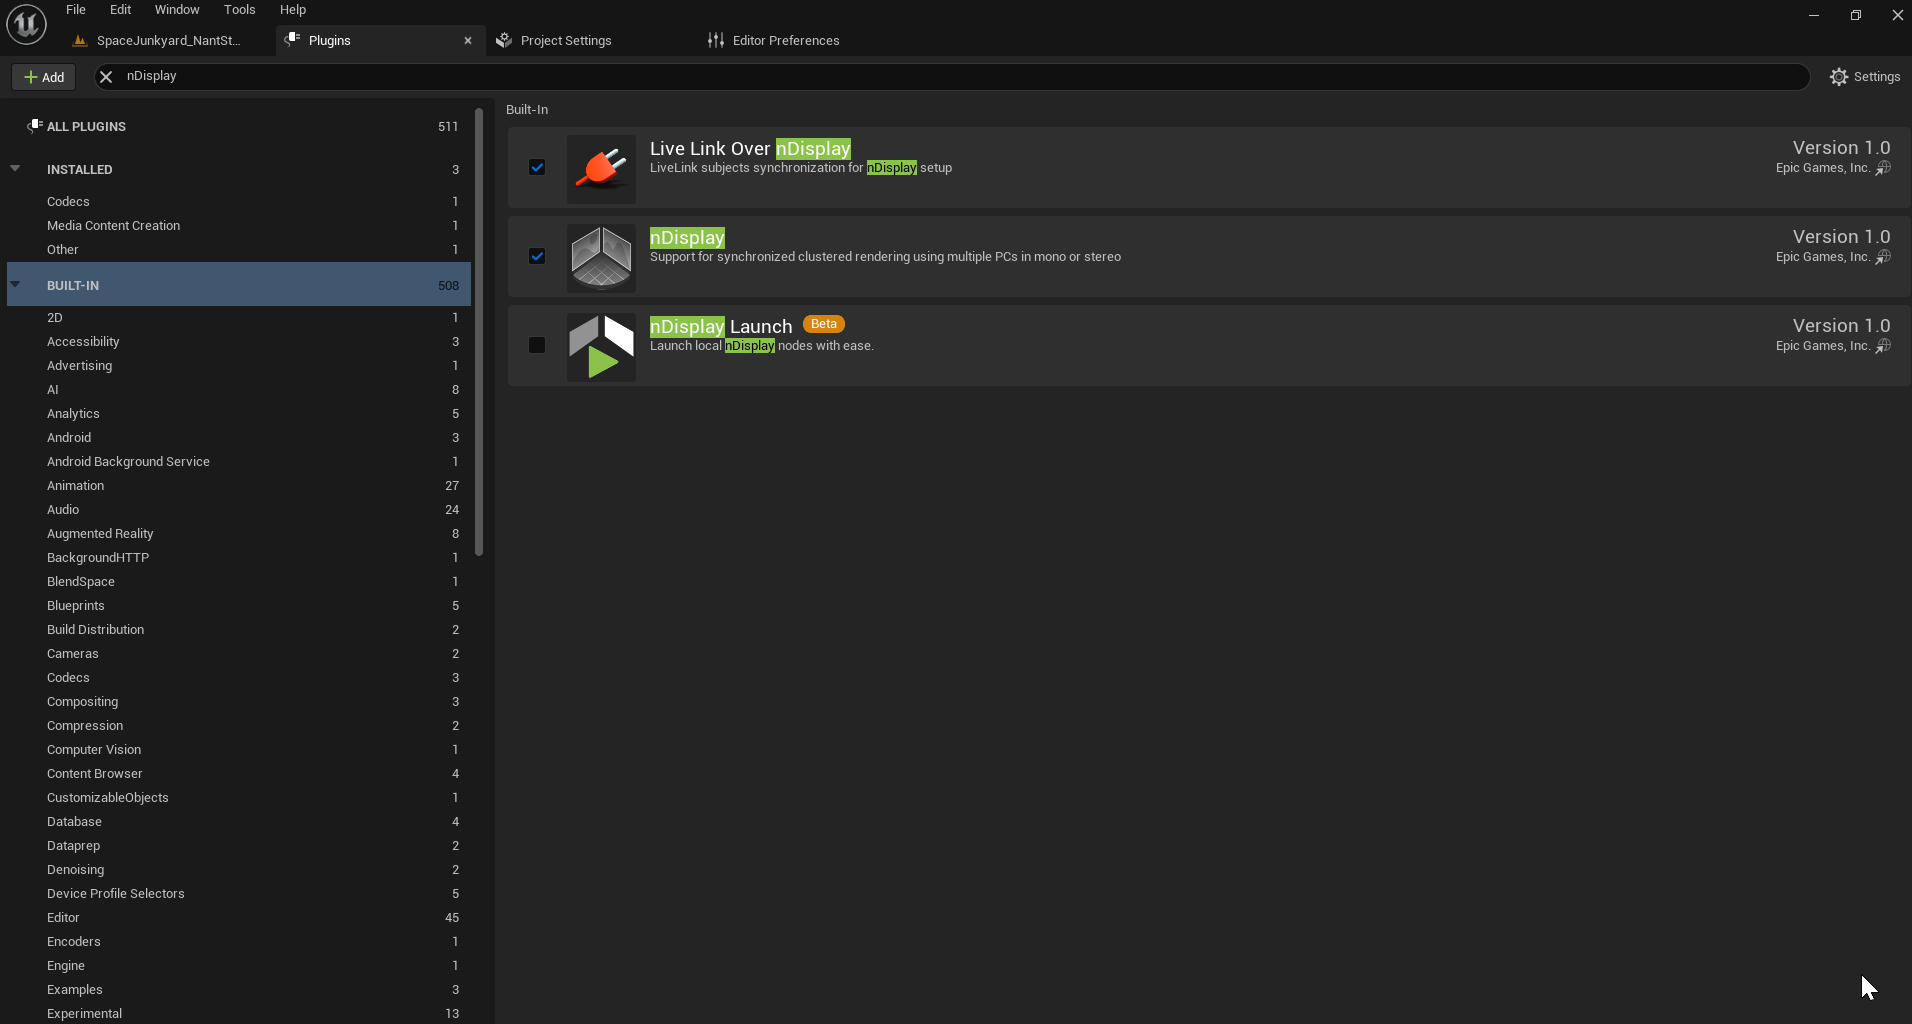
If you already have a project and want to make it work inside PIXERA, you will need to manually set up the following for nDisplay.
You must first enable the nDisplay plugin by going to “Edit\Plugins” and activating nDisplay in the “Built-in” section.
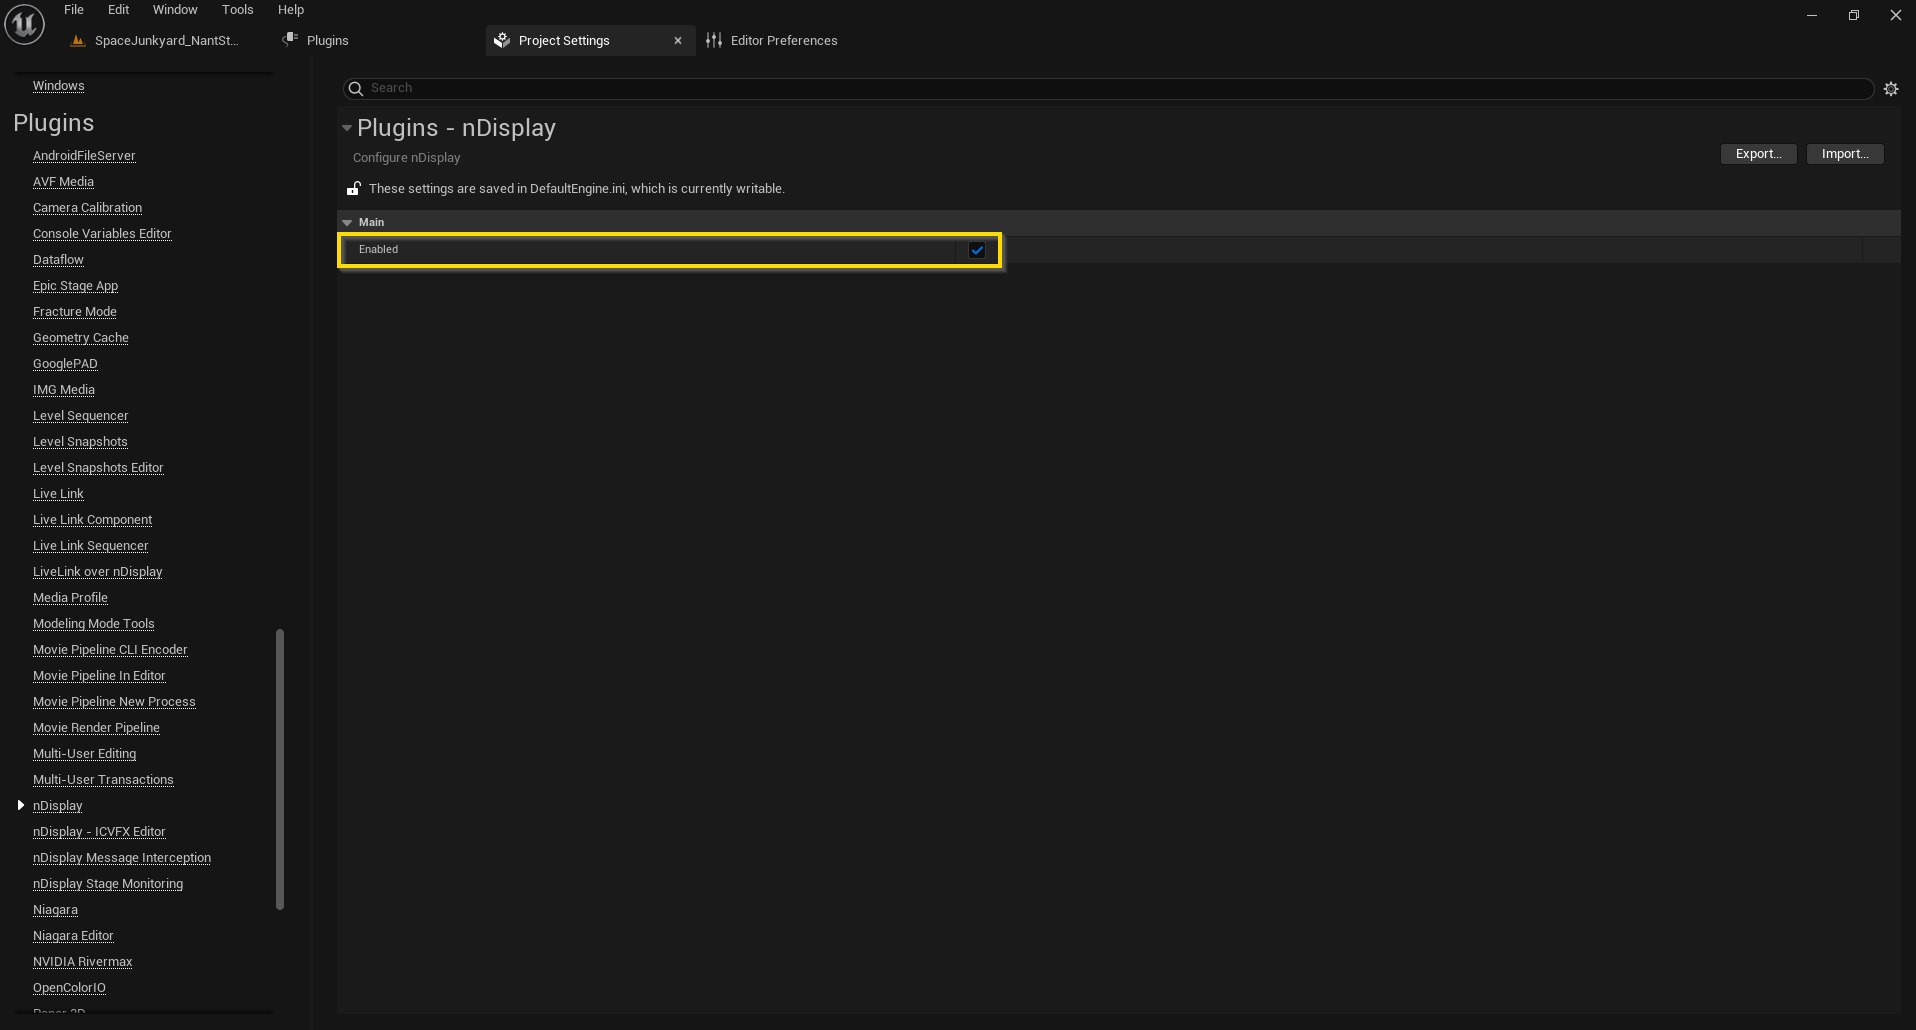
nDisplay must now be turned on in the project itself. This can be done by going to “Edit\Project Settings” in the “Plugins\nDisplay” section and checking the Enabled box on.
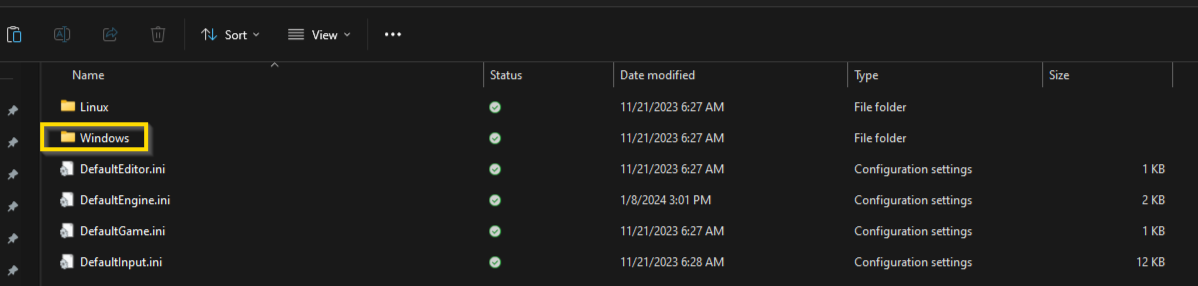
Lastly, some Unreal Projects, such as the ones downloaded from the Marketplace, may not have a “Windows\WindowsEngine.ini” Directory in their Config folder. If this file is not available, then PIXERA will be unable to open the project. This folder and file can be copied from an Unreal Project that does contain it, such as the nDisplay template project.

Unreal Executable Setup
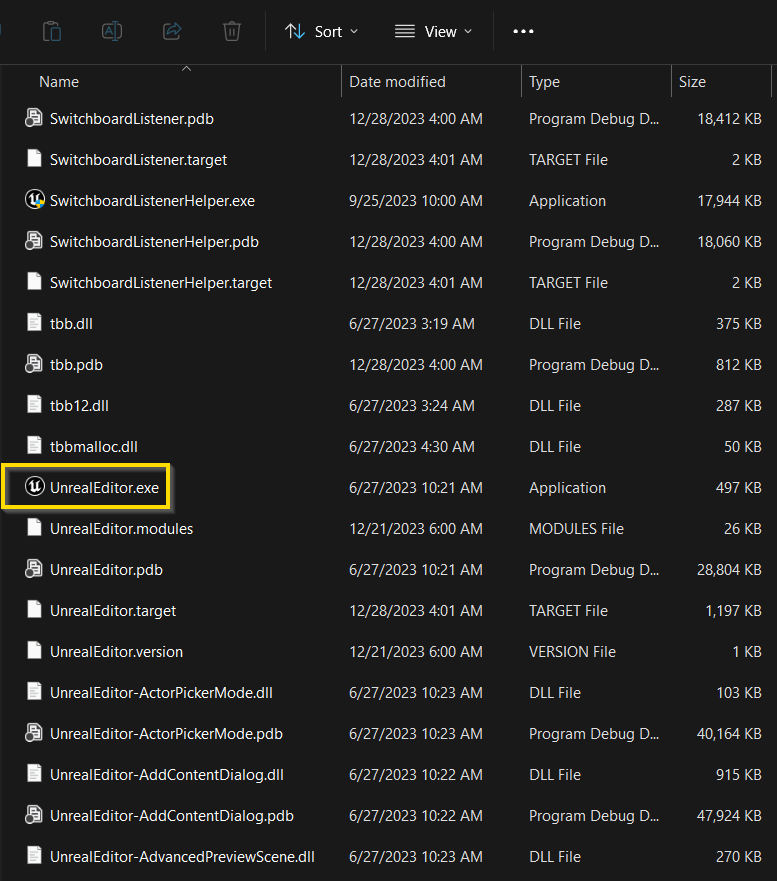
The “Unreal_Engine_5-2-1” zip contains the engine and should be extracted to wherever desired, usually in the initial C or D directory.
Navigating to “Unreal_Engine_5-2-1\Engine\Windows\Engine\Binaries\Win64” you will find a file which in the same location as other Unreal Engine builds being the “UnrealEditor.exe”. Use this executable to run the engine.
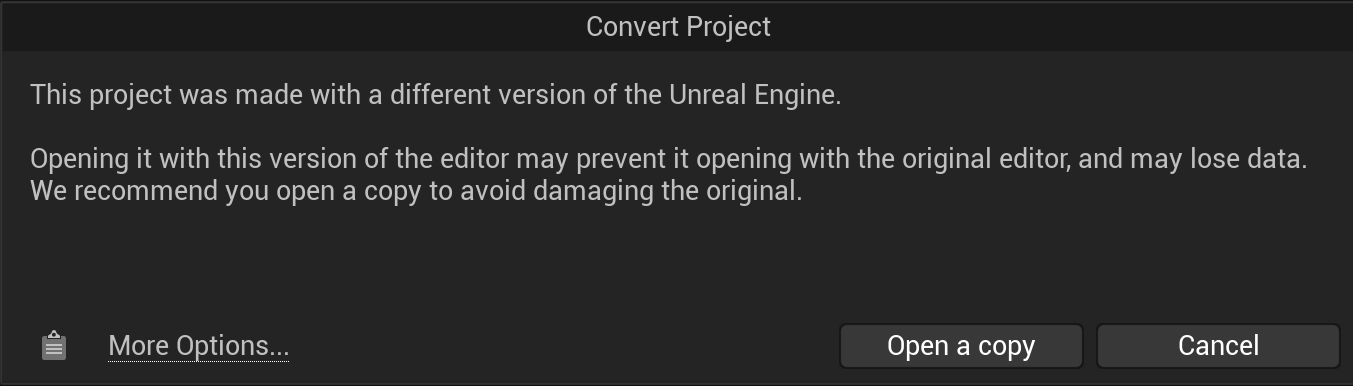
After selecting and opening the project, an Unreal popup will explain that the project should be copied as the Unreal Engine being used is different from what the project was first created it. It is recommended to copy the project and keep this copy available for any rebuilds you may need. Also, this copied project will not open immediately in the vanilla Unreal Engine version, it will instead also ask to copy.
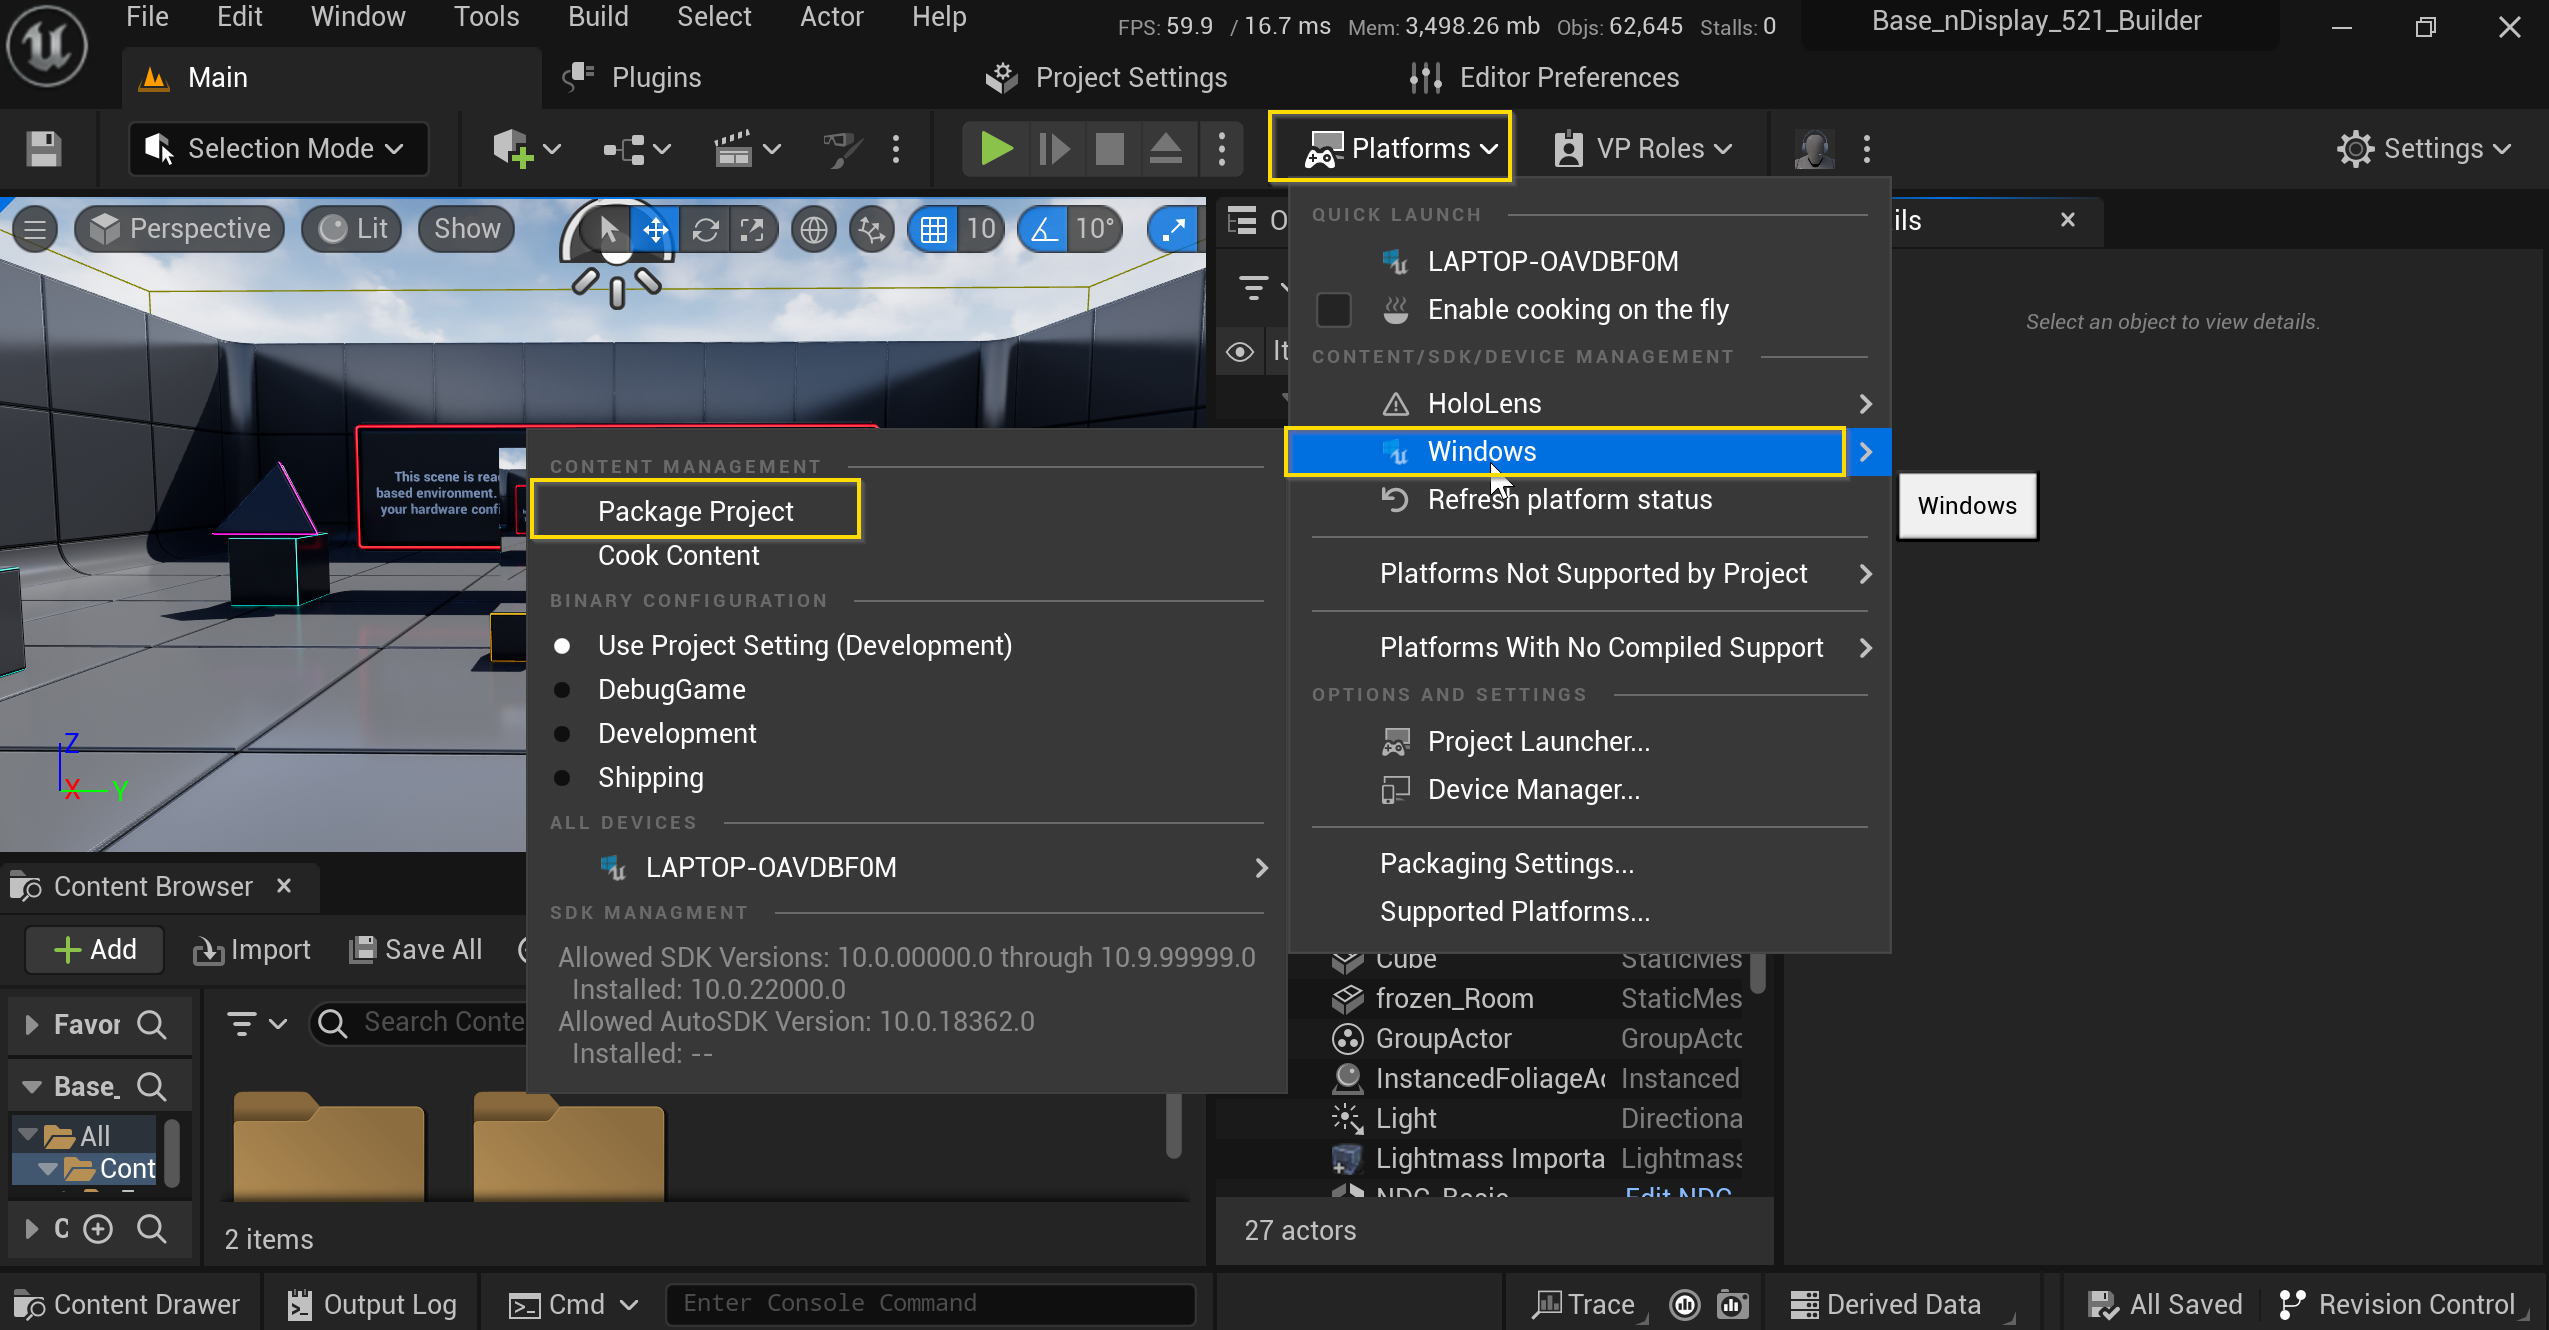
Once the project is open, you can package by going to “Platforms\Windows\Package Project”. The editor will then ask for a location to place the executable. Once selected, the project will begin to be packaged and finish, depending on how large the project being packaged is.
Unreal Multi-User Setup
To run Unreal in Multi-User mode, you must first enable the Multi-User plugin.
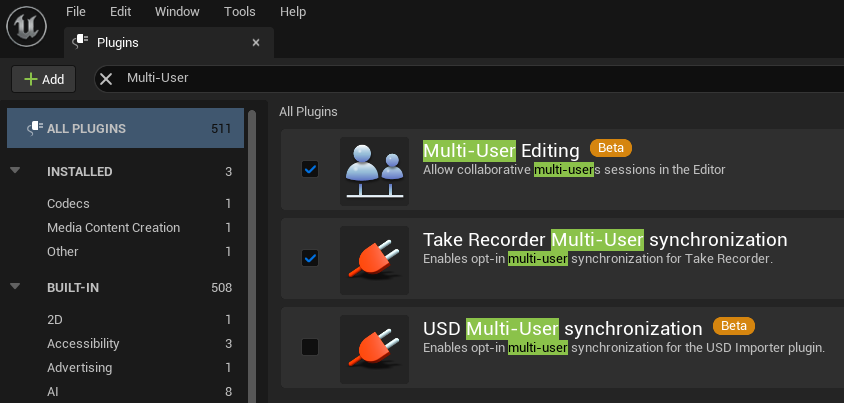
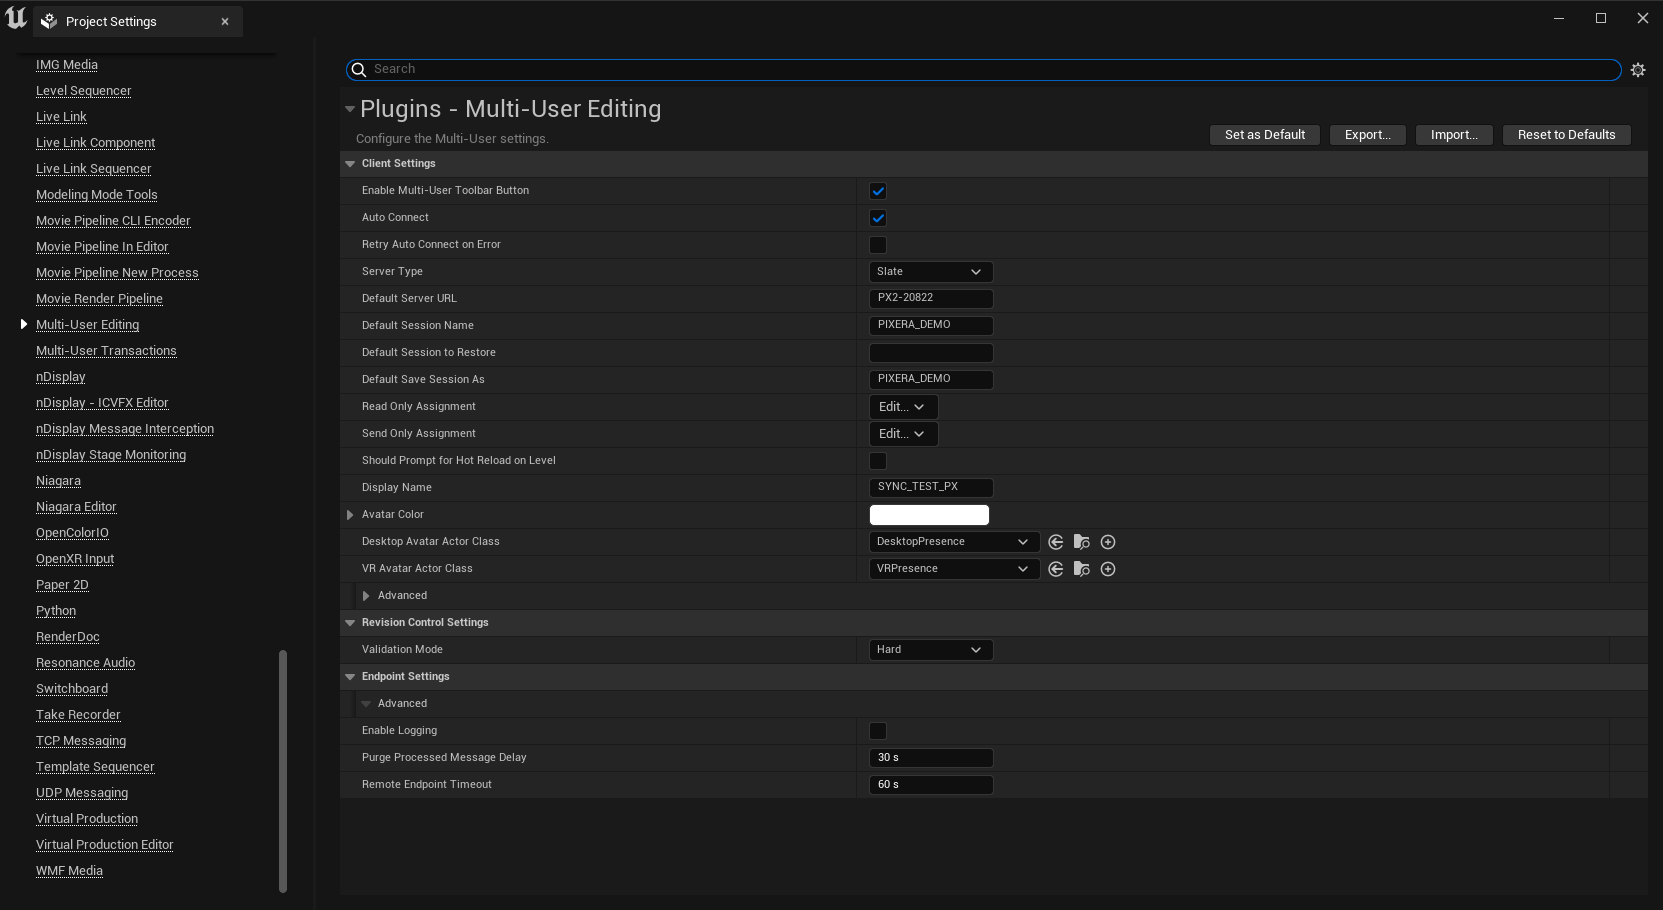
After saving and restarting your Unreal scene, navigate to “Project Settings/Plugins/Multi-User Editing “.
“Enable Multi-User Toolbar Button“ and “Auto Connect“ have to be enabled.
Further, please enter the Windows computer name of your Unreal Server in “Default Server URL“ and assign a name for “Default Session Name“.
Save your project and re-open it.
Click on the arrow next to “Join“ in the toolbar and select “Launch Multi-User Server”.
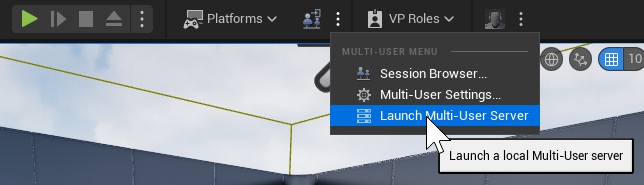
A new window pops up, afterward close Unreal again, and you are all set to bring the project into PIXERA!
PIXERA Interop Setup
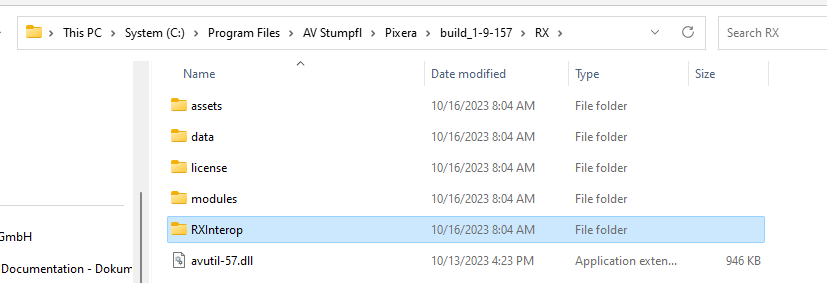
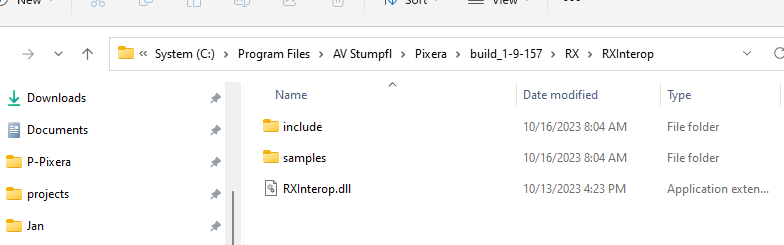
The Interop is an important part of Unreal Integration. Without the correct Interop version, Unreal setups can't be achieved. There are three different Unreal modes in PIXERA. Each mode requires the Interop to be in a different root directory:
-
Dash Game:
- Interop must be placed beside the Unreal Editor (as seen in the screenshots below). Whilst installing the Interop the root install directory can be chosen. Please keep in mind that for multiclient setups, the interop can be transferred directly via PIXERA. If Unreal was installed on the C drive, PIXERA won't be able to copy the Interop because of windows.
-
MultiUser:
- Interop must be placed at the Unreal Editor which will be doing the editing work. Depending on the setup, the Control Instance could be placed on a different server in the network.
-
Packaged:
- Interop must be placed beside the EXE file.
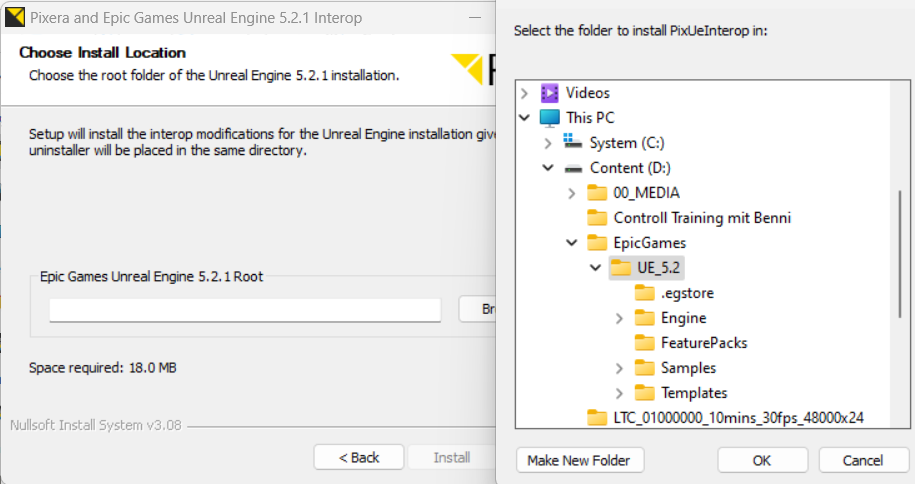
Download the PIXERA Interop from here: Downloads (pixera.one)

Select correct root path. This is the same path as the Unreal Engine installation.

As soon as the installation setups have been completed, unreal projects can be imported into PIXERA as a compositing resource.
Interop is installed into the PIXERA install path:
Furthermore, the Interop installer exchanges the available nDisplay DLL´s in the Unreal Engine root install path. The original DLL´s are being placed inside the “PIXERABackup” Folder.
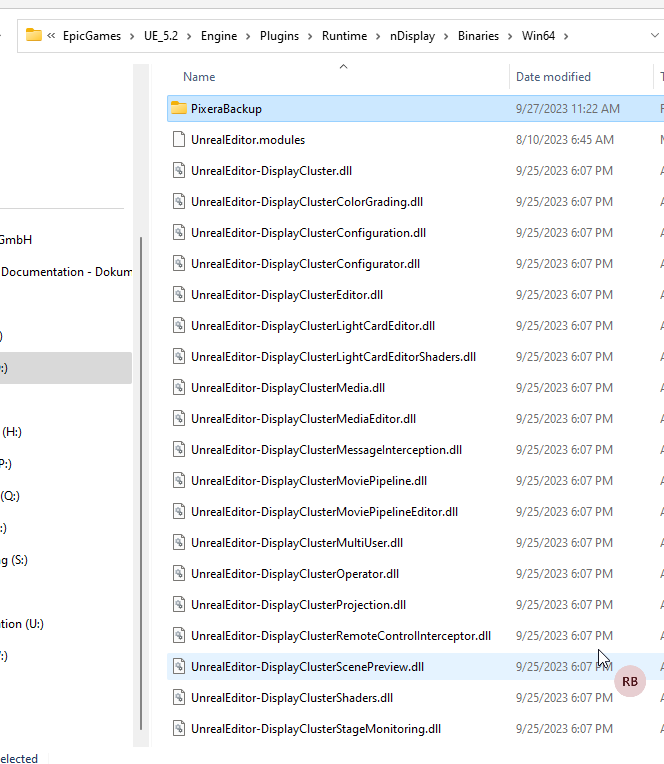
The Interop is then either installed or copied via PIXERA to the root folder of the Unreal Engine:
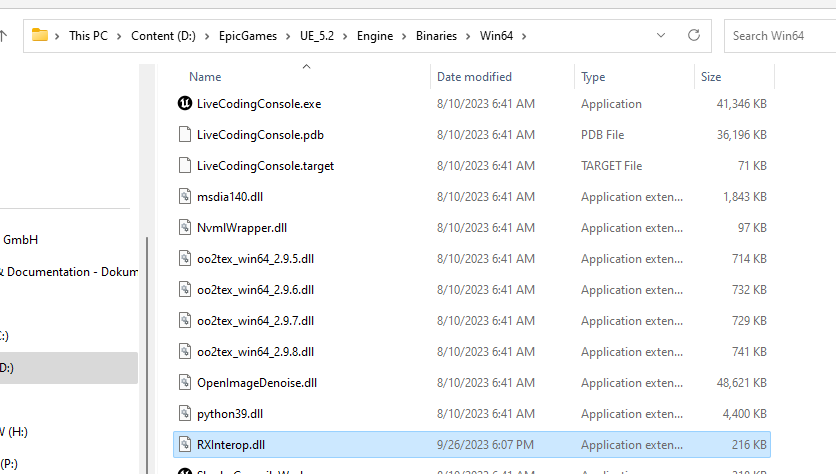
Triggering the “Copy RXInterop.dll To Configured Nodes” button in PIXERA will take the interop from the PIXERA install path and copy it into the Unreal Engine root path.
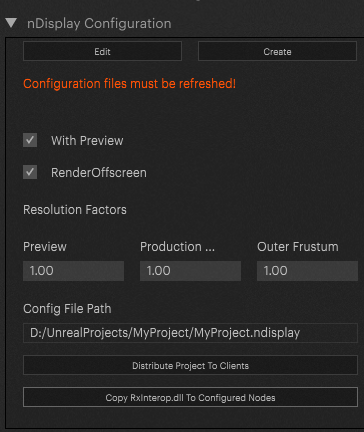
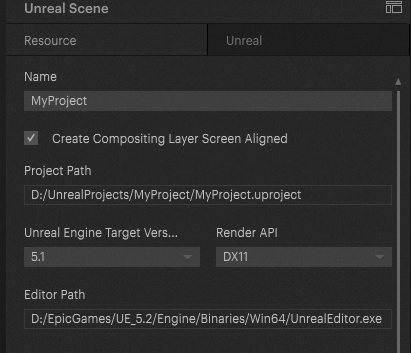
The Unreal Editor path can be found in the PIXERA project:
Warning
When Unreal is installed on the C - Drive, Windows will not allow the copy process (locally as well as on the clients). Therefore, we highly recommend installing Unreal on any other drive to avoid problems.
PIXERA 2.0.65 | 09. July 2024 | CL
Pixel Based Video Mapping
Pixel Based Video Mapping
To better understand the mechanisms explained below, it is advisable to read this article first:
Output Mapping
In some situations, it is necessary to map content pixel by pixel to the output. An example of this would be a display on a façade equipped with individual pixels or tubes.

With standard pixel mapping using feeds (normal LED mapping), you would have to create a separate feed for each pixel in order to then position it at the desired location on the output.

This quickly results in hundreds or even thousands of feeds, which are no longer manageable.
If LED panels are used as screens in PIXERA, it is possible to load this mapping into PIXERA using .csv or .pfm files.
This creates a single feed that contains the entire remapping.
Before doing that, it is necessary to set the “Selective Target Rendering” of that LED to “Texture per Screen”. This setting can be found by selecting the LED in the Screens Tab -Render Settings - Inspector.

The .csv file can be loaded in the Inspector of the selected mapping under ‘Warp’.

The 'war'p' is only visible on the output but not in the warp window on the right hand side.
Before loading the .csv file

After loading the .csv file

The .csv file only contains coordinates for the source position of the pixels and the destination position of the pixels. the example .csv file which was used in the example above, can be found below as well.

After importing the .csv file, PIXERA automatically changes the file type to .pfm. Alternatively .pfm files can be loaded directly as well.
If the source is larger than the destination (i.e. the resolution of the created LED is larger than the resolution of the output), pixels that are outside the output resolution can still be mapped so that they are within the output resolution.

PIXERA 25.2 RC 1 | 17 September 2025 | FE
Further Features & Improvements
- Engine: Enabled Deltacast HDMI audio input.
- Engine: Updated OCIO to v2.4.2.
- API: API Command to activate and deactivate "Allow Protocol Outputs" Button
- File Versioning for Audio
- Cues - Individual Blend Times for Cues
- SP Lens Integration
25.2 Changelog
Pixera 25.2 R36
6 July 26
Fixes
Fix: Mapping: MPCDI: ensure that reloaded mpcdi blend files are correctly applied in engine.
Fix: Mapping: Set mpcdi region in mapping after scale factor has been updated.
Fix: Mapping: Ensure that external configuration is correctly applied on reload.
Fix: Timeline: Timeline Inspector: Not updating after layer switch and color correction open. Fixed.
Fix: Timeline: Jump cue to time: fails when another jump or trigger cue is at goal time. Fixed.
Fix: Content Mapping: Content mapping: rounding error fixed.
Brushes
Brush: API: Optional scale parameter for mpcdi calibration added.
Pixera 25.2 R27
23 April 26
Fixes
*Fix: DMX: Fixed not being bale to set transport mode on layers in grups via DMX
*Fix: Resources: Fixed not respecting suffix end when loading original file not containing suffix end
*Fix: Resources: DMX controls in inspector are now available for layer reference resource.
*Fix: Timeline: Selection problems with layers in groups fixed.
*Fix: Timeline: Resolved an issue causing an endless reparent loop when dragging a group onto itself.
*Fix: Mapping: Deleting of additional mappings feeds for projectors fixed.
*Fix: GUI: Button visibility in warp engine fixed.
*Fix: Studio Camera: Direct API 'cut to camera' fixed for multiple studio cameras which share the same compositing output.
*Fix: Engine: Fixed potentially rendering at 1Hz when binding to swap barrier.
*Fix: Engine: Fixed webresource texture sharing with preview engine on multi GPU systems
*Fix: Engine: Fixed switching between multiple studio cameras with lens correction.
*Fix: Engine: Fixed 8k projector signal quadrant processing.
*Fix: Engine: Fixed web resource only visible on first screen.
*Fix: Engine: Fixed closing outputs with Blackwell GPUs
*Fix: Engine: Fixed potential crash after “WARNING resynchronizing audio output”
*Fix: License: 25.2 can be started with UAP licenses but is valid for all build dates.
*Brush: Projector: Ignore lens limits in set methods to allow more extreme values from external calibration.
*Brush: Mapping: Limit softedge resolution to target resolution for projector using feed area.
*Brush: Service: Outputs: Synchronize display checkbox always enabled.
Pixera 25.2 R12
25 Nov 25
Fixes
*Fix: Unreal: Create lights from inside PIXERA again
*Fix: UI Layout: Fix engine stutter when detaching timeline.
*Fix: UI Layout: Fix broken Control layout after applying layout when Timeline is detached in Compositing.
*Fix: UI Layout: Fix detached Timeline after changing the layout.
*Fix: Mapping: DMX output mapping: unhandled exception fixed when entering alphabetic characters for stride, shift or value.
*Fix: Mapping: Load inspector with fallback mapping for marker calibration if external marker from API is selected.
*Fix: Timeline: Notch block is unloaded when the referencing timeline is stopped, even though preload (for effects and layer reference resources) is activated. Fixed.
*Fix: Timeline: Selection of Layers was possible in collapsed groups.
*Fix: Timeline: Improved consistency of clip selection within layer groups.
*Fix: Timeline: Layer group shows as muted only if all children are muted.
*Fix: Timeline: Snapping did not work properly in layer groups.
*Fix: Timeline: Timeline with non-integral framerate enabled: newly added audio clip with correct duration.
*Fix: Timeline: Cue blend behaviour of previous releases restored if no blend duration is set.
*Fix: Engine: Fixed Notch block showing old frame on input change
*Fix: DMX: Real time color correction of projector mappings can be controlled from dmx.
*Fix: API: Allowlist is not disabled anymore if dialog is closed by pressing 'Cancel'.
*Fix: Multi User: Clip in timeline updates the used resource on import if the resource is not found or the file path doesn't matc
*Fix: Vioso: Loading vioso warp files on clients from Vioso 5 without ip address in file name fixed.
*Fix: Notch: Notch Block Does Not Render With "Keep Notch Block Preloaded" On. Fixed.
*Fix: GUI: Import Cue window no longer appears after canceling cue import.
Brushes
*Brush: GUI: Added warning to indicate impact when enabling "Refresh Resources On Load"
*Brush: Resources: Project compatibility improved when opening projects in 25.1 which were saved in 25.2.
Pixera 25.2 R3
14 Oct 25
Fixes
*Fix: Unreal: Create lights from inside PIXERA again
*Fix: Engine: Audio input (for LTC Timecode in) sometimes does not work on PIXERA restart.
*Fix: Engine: Blendmap transfer after reconnect.
*Fix: Engine: Improved performance when tracking multiple screens.
*Fix: Engine: Improved detection of lost LTC input signal.
*Fix: Engine: Notch Blocks not showing up on multiple screens when not "Screen Aligned".
*Fix: Engine: Fixed life input freeze for NDI/Spout.
*Fix: Engine: Freezing output causes live input preview to freeze.
*Fix: Engine: Fixed rendering of multiple Notch samplers sharing one instance.
*Fix: Engine: Audio does not loop when setting play mode to "Free Loop".
*Fix: Engine: Improved Notch rendering performance when timeline is stopped.
*Fix: Engine: Improved automatic adapter selection for web resource.
*Fix: Engine: Fixed flashing preview when content is missing.
*Fix: Engine: Fixed loop inputs causing vanishing output when you press dominant transport lock to time button.
*Fix: Engine: Fixed negative speed when set as layer dominant value.
*Fix: Engine: Fixed alpha when making the output window transparent.
*Fix: Engine: Rebuilt ffmpeg for compatibility with CPUs before Haswell/Excavator.
*Fix: Engine: Not showing the last frame when loop outro ends.
*Fix: Engine: Fixed "Refresh" on Notch resources.
*Fix: Engine: Fixed Notch layers which are visible on multiple screens keep reallocating input textures.
*Fix: Engine: Fixed cleanup of transfers when Presence is closed.
*Fix: Timeline: Dominant Resource: Activate looping after starting dominant playback ignores loop. Fixed.
*Fix: Timeline: Layer audio service selection uses multi selection.
*Fix: Multi User: Control module pull no longer requires prior project transfer.
*Fix: Multi USer: Re-transferring missing files when pushing folder.
*Fix: Multi User: Refresh of resource will also refresh on other mu members.*Fix: Multi User: Number of Control modules that have external connections reset after multi-user content reception.
*Fix: Multi User: File version distribution across mu members can handle multiple new versions added at once.
*Fix: Multi User: Updating resource and engine after loading new file version.
*Fix: Multi User: Replacing resource will be handled correctly
*Fix: Multi User: Preview settings will be carried over to other mu members after replacing a resource
*Fix: Workspace: Wrong UI element showing active dominant value in workspace fixed.
*Fix: Workspace: Ctrl+9 shortcut with keyboard focus on workspace also toggles statistics in preview.
*Fix: UI Layout: Prevent layout reset when adding log.
*Fix: UI Layout: Fix incorrect CfWindow handling in detached Control.
*Fix: GUI: Possible problems with fixture channel visualization fixed.
*Fix: GUI: GUI freeze fixed when Discovery had unavailable adapter selected and audio settings were selected.
*Fix: Resources: Image sequences imported by watch folder, get attributes set correctly according to tooltip/warning
*Fix: Resources: Possible crash fixed if image sequence candidate contains '+' in file name
*Fix: DMX: DMX Patch Table was not showing Lock To Time options to set
*Fix: DMX: Issue with transport mode loop reset resolved
*Fix: Screens: No panel array options for screens based on custom object.
*Fix: UIB: Paths with a project name were displayed incorrectly in the block functionality of the scriptbuilder.
*Fix: Projectors: Only show multi user controls for projectors in venue.
*Fix: Control: Fixed broken stype module after added getFreq
Brushes
*Brush: Engine: Correcting colorspace when video has contradicting metadata (RGB vs. YUV).
*Brush: Engine: Gracefully handling shortly disappearing NDI streams.
*Brush: Engine: Automatically generating textureLod overloads in effect shaders.
*Brush: Engine: Removed no longer needed trivial textureSize overloads in effect shaders.
*Brush: Multi User: Multi User button in top bar with right click menu.
*Brush: Multi User: Usage application is distributed via multi user.
*Brush: UIB: Some options of self.utility.web were not available in api browser.
*Brush: Resources: Plain path to cube luts replaced with color lut resource usage.
*Brush: API: Allowlist (accessible via top bar) to limit API access.
*Brush: Studio Camera: Studio camera can change rotation order of DirectAPI input.
Pixera 25.2 RC 9
29 Sept 25
Feature
*Feature: API: API Command to activate and deactivate "Allow Protocol Outputs" Button
Fixes
*Fix: Unreal: Create lights from inside PIXERA again
*Fix: Unreal: Set visibility of unreal objects correctly
*Fix: Studio Camera: Set extension did not work reliably after start up. Fixed.
*Fix: DMX: Fixed calculation of universes when absolute universe is entered
*Fix: DMX: Fixed issues with editing the universe of a layer when multiselection was present
*Fix: DMX: Auto Patch works for screens now
*Fix: DMX: Autopatch was still working in the background on universes when turned off, causing issues
*Fix: DMX: sACN universe readout mode did not show maximum of sACN universe
*Fix: UI Layout: Fix context menu handling in Compositing Inside and Mapping Screen Feeds
*Fix: GUI: Fixed loosing I/O routing placements when not opening I/O routing during last session and the saving.
*Fix: GUI: Batch assigning dmx ids no longer possiblen when folder doens't have one set.
*Fix: UI Layout: Fix broken context menu in detached control tab
*Fix: UI Layout: Fix strange scaling in Compositing when Control is detached
*Fix: I/O Routing: Crash when rerouting outputs
*Fix: I/O Routing: Loosing warp when switching outputs in I/O routing
*Fix: UI Layout: Prevent resizing of Detached Control Window
*Fix: UI Layout: Fix wrong Layout scaling caused by detached Control
*Fix: UI Layout: Fix detached control's layout reset on app mode change
*Fix: Workspace: 2d oriented transformation of warp control points fixed.
*Fix: Viewport: Snapping in 3D space works again
*Fix: Vioso: API command does not start a new Vioso instance if another one is already running.
*Fix: API: Missing resource types added to Resource::getType(.).
*Fix: Control: Remove SetThreadDescription dependency
*Fix: Timeline: Fixed unintended deletion of layer groups.
*Fix: Timeline: In some cases clips on layers under a layer group were displayed at the wrong time.
*Fix: Timeline: Possible selection issues in preview with layers part of a group fixed.
*Fix: Timeline: Duplicated cue does not loose trigger on leave value anymore.
*Fix: Timeline: In some cases drag and drop of group into another group changed the layer hierarchy.
*Fix: Timeline: Layer group rename with shortcut F2 fixed.
*Fix: Timeline: Usage tags do not double anymore in layer audio destination combobox.
*Fix: Timeline: Shift + Drag Cues to copy/paste not working anymore.
*Fix: Timeline: Preview Edit: Cues execute network commands when edit nowpointer reaches them.
*Fix: Timeline: Preview Edit: Trigger cues are executed by preview edit nowpointer
*Fix: Timeline: Dragging a Notch block on two layers does not work correctly.
*Fix: Timeline: Dominant Resource: Activate looping after starting dominant playback ignores loop.
*Fix: Timeline: Selection of Bezier Curve Points was not possible.
*Fix: Timeline: Fixed Cue CSV import issue caused by Excel converting Timeline IDs into scientific notation.
*Fix: Timeline: Improved Layer Group Selection. A yellow selection box is now drawn when all clips in a group are selected.
*Fix: Timeline: Fixed an issue that Layer Groups have not been selected correctly on vertical scrolling.
*Fix: Timeline: Selection of Datalayers was not working via left mouse click.
*Fix: Timeline: Insert time now also affects layers in group.
*Fix: Timeline: Mismatch between nowpointer and scrolled position of timeline which happened in some situations after zooming in is fixed.
*Fix: Timeline: Timeline duration is extended correctly if a clip is added at the very end to a layer which is part of a group.
*Fix: Timeline: Free Loop Clips: Not starting playback when running into pause cue positioned at the beginning of the clip.
*Fix: Timeline: Added ability to select clips inside collapsed groups when drawing a selection box.
*Fix: Timeline: Fixed a dragging issue when groups and clips are selected together.
*Fix: Timeline: Fixed wrong layer index being used when duplicating layers within groups.
*Fix: Timeline: Problems with pause cue fixed introduced by change in previous version to fix problems with free looped clips.
*Fix: Effects: Possible crash in GUI with ScanLines effect fixed.
*Fix: Effects: Specific combinations of layer effects did not work correctly.
*Fix: Engine Integration: Output can be set to Free Run again.
*Fix: Presence: Default size corrected
*Fix: Live Systems: Unused files can be deleted from custom asset root on clients now.
*Fix: Live Systems: Utilized graphics device for Deltacast outputs was reset after engine restart. Fixed.
*Fix: Live Systems: Performance Monitoring: per output performance infos are cleared when service disconnects.
*Fix: Library: Reset LibrarySearch when resetting layout.
*Fix: Resources: Mask resource shows assets although they are not used. Fixed.
*Fix: Resources: Distribute newly added LUT resource to multi user members.
*Fix: Resources: Not possible to add notch block as custom effect anymore.
*Fix: Multi User: Cue network command properties are synced with incremental updates.
*Fix: Multi User: Pushing resource folders from system with different tinmeline state does not override timeline on receiving system anymore.
*Fix: Multi User: Pushing back and forth of resources between mu members breaks resources. Fixed.
*Fix: Multi USer: [Multi User: r: GUI-3603] Changes in file versions will no longer be automatically pushed if incremental updates are turned off.
*Fix: Multi User: Local live input re-routing for incoming multi user projects fixed. Wrong device was chosen if service contains multiple devices of the same type (e.g. SDI input cards).
*Fix: Mapping: Correctly initializing warp meshes created from a MVR file.
*Fix: Mapping: Mapping errors fixed for screen with higher resolution than output.
*Fix: Mapping: Color correction (LUT and RT) are now applied correctly after startup/project load.
*Fix: Audio: Audio will no longer be routed to unconnected services, fixing backup audio takeover
*Fix: Audio: Audio Clips Too Close On The Same Layer Won't Follow KeyFrames.
*Fix: Content Mapping: Feed renaming in project tree fixed.
*Fix: Warping: Catmul Rom modifier fixed for vertices outside the control points.
*Fix: Cue List: Fix disappearing cues when resizing with horizontal scrollbar visible.
*Fix: Cue List: Update cue color immediately
Brushes
*Brush: Vioso: Api function added to close a currently running Vioso calibration.
*Brush: API: More setup related functions added to Timeline::Layer.
*Brush: API: Added Api Calls for Real Time Color Correction.
*Brush: API: Paramter order changed for layer setup related functions added in 25.2 INTER 42 to match order in UI.
*Brush: Database: LED and projector database updated.
*Brush: Content Mapping: Non screen aligned compositing layer works with content mapping resource.
*Brush: Content Mapping: Destination position shows values related to upper left corner of associated screen.
*Brush:Pixel Based Video Mapping: Ensure black in unmapped areas
*Brush: Content Mapping: Several changes to content mapping. Associated screen usage improved. Destination preview fixed.
*Brush: Installer: Installer copies ExtTouchDesigner.dll into new data directory.
*Brush: Live Input: Preview stream generation can not be disabled in Video Stream inspector anymore. The state is determined solely by the resource.
*Brush: Settings: Changed default discovery filter to 255.255.255.0.
*Brush: Timeline: Performance improvements when clip is deleted (avoid redundant updates if multiple clips are deleted from the same timeline).
*Brush: Timeline: Setting Fade to Time/Cue duration should be allowed to be set to 0.
*Brush: Mask: Resource is used for image as element instead of plain path to image file.
*Brush: Resources: Resource inspector for Touch Designer and Generic Extension resources with more options.
*Brush: Audio: Indicate when selected system for audio can't be used especially relevant for hybrid mode.
Pixera 25.2 INTER 38
12 Aug 25
Feature
* Feature: File Versioning for Audio
* Feature: Cues - Individual Blend Times for Cues
* Feature: SP Lens Integration
Fixes
* Fix: API: API while Preview Editing: Playback mode changes when calling methods that should exclusively set timeline time. Fixed.
* Fix: API: API: While in preview edit the currentTime methods return preview edit nowpointer time instead of output time. Fixed.
* Fix: Assets: Taking distribution target override into account when deciding if missing resource should be distributed on live system connect.
* Fix: Assets: Fixed unwanted transfers upon service connection that could happen under some circumstances
* Fix: CITP: Fixed an issue that Thumbnails where not displayed correctly in stored presets on GrandMA2.
* Fix: Control: Availability of Control keyboard shortcuts ensured after application startup.
* Fix: Engine Integration: Update camera matrices for generic extensions.Fix: GUI: More checks added if drop after drag operation is allowed for tree elements.
* Fix: GUI: Fixed shortcut processing after changes between different app modes.
* Fix: I/O Routing: Ensure single connection between node slots.
* Fix: Live Input Preview: Live input preview restored after engine restart.
* Fix: Live Systems: Client engine operations (e.g. start/stop) no longer lead to an undo stack entry, avoiding invalid engine state representations on undo execution.
* Fix: Live Systems: Client engine operations (e.g. start/stop) no longer lead to an undo stack entry, avoiding invalid engine state representations on undo execution.
* Fix: Live Systems: Ensure correct target location for preview tasks
* Fix: Live Systems: Setting to only consider preferred IP after application start fixed so that it is independent of other settings.
* Fix: Mapping: Possible freeze fixed when when backup is triggered and usages are applied to backup system.
* Fix: Multi User: Prevent application freeze when pushing settings immediately after project
* Fix: Node Space: Remove orange outline from nodespace.
* Fix: Resources: File chooser dialog for generic extension compositing resource is shown again.
* Fix: Resources: Fixed delay when importing content
* Fix: Resources: No longer ignoring global case sensitivity setting.
* Fix: Screen Groups: Undo/redo for different screen group changes corrected.
* Fix: Screens: Screen with negative scale does not lead to wrong perspective positioning anymore.
* Fix: Settings: Avoid empty settings pane even though setting sub section is selected.
* Fix: Timecode Input: Timecode input drift correction reacts more effectively to slowed-down input.
* Fix: Timeline: Audio: Rare, brief drops in volume within a continuously running timeline. Fixed.
* Fix: Timeline: Cues - Activity State: ""Ignore once"" not resetting after hit. Fixed.
* Fix: Timeline: Cues can not be moved above each other if timeline gap is closed between two cues.
* Fix: Timeline: Cues: Inspector wrongly shows timeline properties after selecting a cue very close (overlapping) to the right of another cue. Fixed.
* Fix: Timeline: Cues: Trigger on leave not working, when Cue was triggered from Cuelist Browser. Fixed.
* Fix: Timeline: Free Loop Clips: Inpoint handled incorrectly. Fixed.
* Fix: Timeline: Free Loop Clips: Wrongly pausing loop after replacing resource of clip with finite outpoint. Fixed.
* Fix: Timeline: Inner Loop: Stuttering Output When Entering Inner-Loop Inpoint or Leaving Inner-Loop Outpoint. Fixed.
* Fix: Timeline: Keyframes: Not snapping to frame raster anymore after changing Timeline fps. Fixed.
* Fix: Timeline: Layer Offsets: "Store and Reset" still adds former dominant value to the newly stored offset. Fixed.
* Fix: Timeline: Loop Inpoint/Outpoint: No restart of video when running Nowpointer is set from within a clip very close to the front of the clip (Loop Outro triggered via cue). Fixed.
* Fix: Timeline: Preview Edit via API: endPreviewEdit() and startPreviewEdit() do not work as expected. Fixed.
* Fix: Timeline: Transport Keys: Missing update when using keyboard to move nowpointer. Fixed.
* Fix: Timeline: Undo of multiple layer properties corrected. Clip space position is now saved to project.
*Fix: Timeline: Fixed selection issue with bezier control points.
* Fix: UI Layout: Fix CF_Window in detached Control
* Fix: Usages: Usage application no longer reconfigures live inputs to match usage source (rather, routing is only via live input resource).
* Fix: Workspace: Do not draw selection box constantly for small layers.
Brushes
* Brush: API: API: Added methods to set and get Preview Edit Nowpointer time and playback mode.
* Brush: API: DirectAPI: display user notification if reload is triggered due to automatic staleness check.
* Brush: Content Mapping: Content mapping resource can be duplicated.
* Brush: GUI: Redundant error messages from render engine are filtered and not every message is presented as user notification.
* Brush: GUI: Shortcut 'F2' for rename usable in librry trees and for cues in cue list.
* Brush: Live Systems: Client auto-start emphasizes manager/client relationship.
* Brush: Live Systems: Preferred IP allows association between manager and client.
* Brush: Presence: Option to minimize presence after startup added.
* Brush: Studio Camera: Studio camera screen group settings are preserved when different render targets of the camera are disabled and enabled again.
* Brush: Timeline: Fade to Cue: Also Apply Delayed Blend Time (Editable in General Settings) Analog to “Fade to Time”.
* Brush: Timeline: Layers without home screen get a layer mapping if they are not set to "Only Render on Home Screen".
* Brush: Timeline: New Selection Mode Button to select either only Clips or Clips and Keys in Timeline.
* Brush: Timeline: Timelines can be excluded of render order change implied by "render on top at play" to keep them always on top.
* Brush: Effects: New effects added.
Pixera 25.2 INTER 38 | 12. August 2025 | LW