 Contact Us


This article describes how to setup a PIXERA Project File to use Tracking Modules for moving Screens and make sure the content behaves as expected for correct rendering and Output.
An example PIXERA Project File with multiple examples of the workflow discussed using PSN for tracking is available Here. It uses version 25.1 R 1, so any missing content can be replaced with your own or by navigating to PIXERA's Standard Content folder.
Settings to Change
Following are important settings in the PIXERA tabs to change for any moving Screens, some are separated into a Display/LED section and a Projection Screen section as the settings differ.
Warning
It is recommend to uninit() any currently used Tracking Module especially if already connected to the Screen as this can cause conflicts as the settings are being changed. Once all settings are set the Module can be init().
From there any changes to the settings should again have the Tracking Module be uninit(), then init() when finished.
Screens Tab
Display/LED
Go to the Screens tab and select the Display/LED that will be moving. Then in the Inspector on the right side scroll down and find the Render Settings section.

Inside is a setting called Selective Target Rendering which should be set to Texture per Screen for any moving Display/LED.
This is because the render engine will make sure to check the Screen's settings for how the content should be rendered, in this case due to the Screen's position and rotation being necessary for the rendering as it is not in the same location at all times.
Projection Screen
You do not need to do this step for Projection Screens as this will be done in the Mapping tab coming up.
Mapping Tab
Display/LED
Go to the Mapping tab and select the Display/LED. Then in the Inspector on the right side under the Setup tab find the Dynamic Screen Setup section.
Inside are a variety of settings:

-
Use Perspective with Direct API: This should be checked on as it is needed for the Perspective to correctly follow the Screen's movements.
-
Apply Automatic Mapping Updates:
- Should be checked off during showtime, because if on this setting would make an update every time the Screen has moved leading to heavy performance usage.
- Should be checked off during showtime, because if on this setting would make an update every time the Screen has moved leading to heavy performance usage.
- Trigger Mapping Update: These buttons are for manually updating the Output to use changes Mapping values. Unnecessary if Apply Automatic Mapping Updates is checked on.
Note
The Transformation Animation Duration (Seconds) setting is being looked into, will be updated at a later time.
Projection Screens
Go to the Mapping tab and select the Projection Screen. Then in the Inspector on the right side under the Setup tab find the Dynamic Screen Setup section.
Inside are a variety of settings:

-
Selective Target Rendering: Should be set to Texture per Screen for any moving Projection Screen. This is because the render engine will make sure to check the Screen's settings for how the content should be rendered, in this case due to the Screen's position and rotation being necessary for the rendering as it is not in the same location at all times.
-
Slice Warp Mesh with Projector Frustrum: Check off this setting, if on, this setting would make an update every time the Screen has moved leading to heavy performance usage.
If this is checked, any changes made to Vertex modifiers will be reset!
-
Use Perspective with Direct API: Check on this setting, it is needed for the Perspective to correctly follow the Screen's movements.
- Apply Automatic Mapping Updates: Check off this setting, similar to the slice setting, this setting would make an update every time the Screen has moved leading to heavy performance usage.
WARNING
This setting directly relates to the Dynamic Softedge feature discussed later. With this off, changes to the Dynamic Softedge's settings will not take affect until a Mapping Update is made.
If performance allows during programming, you can have Apply Automatic Mapping Updates checked on to give real time updates for faster programming. Keep in mind you may experience unexpected jittering and visual issues if performance is exceeded, which is why during showtime/once Dynamic Softedge is setup to your liking that it is then checked off.
- Trigger Mapping Update: These buttons are for manually updating the Output to use changes Mapping values, mainly involving the Dynamic Softedge settings mentioned later. Unnecessary if Apply Automatic Mapping Updates is checked on.
NOTE
The Transformation Animation Duration (Seconds) setting is being looked into, will be updated at a later time.
Compositing Tab
Depending on the Screen type, the settings below will behave differently and are noted.
In the Screen Group tab, select the Moving Screen name inside a Screen Group, and naviagate on the right side to the VR Setup section:

-
Use with Input from Control or Direct API : Check on this setting. If this setting is not on you will see the content stuttering heavily as the Screen moves.
-
Controlled Parameters:
- Set to Free Perspective Camera if you want the perspective to be what follows the Screen.
- Set it to Eye Point if you want the eyepoint to be what follows the Screen.
- This decides whether the setup has a fixed eyepoint that then is rendering out at different angles, or if the setup has a moving eyepoint that is itself rotating to render at different angles.
NOTE
The Eye Point option will only work if the Action setPosRotAndPerspectivePos() is being used with the incoming Tracking Data, otherwise both options will just move the Perspective not the Eye Point.
However you can still manually change the Eye Point location if it is not being affected to have it point from a different set location.
-
Overscan: This setting will increase the Perspective resolution size by the factor given. For example, 1 will be the current Perspective resolution, whereas 2 will be twice the resolution being rendered. This can be useful for needing outside rendered content if the Screen goes too far off the expected path.
- API Smoothing Factor: Can be used to smooth out the Perspective's movement if there is slight stuttering occuring on the content. The larger value the Smoothing Factor is set to, the stronger the interpolation will be so increase this until the issue is resolved. Mostly needed for fast moving/inaccurate tracking.
Next select the Screen Group itself to look at the Perspectives Follows Screen Positions setting which affect all Layers being used on the corresponding Moving Screen:

-
Displays and LEDS:
- Check on if you want the content to be “revealed” by the Display/LED. This will allow the content to appear as if it is in a fixed point in space and the moving Screen is just a window to see that content.
- Keep off if you want the content to follow the Display/LED as it moves around. This will allow the content to appear in the exact way you set and not be lost as the Screen moves.
-
Projection Screens:
- Check on if you want the content to be “revealed” by the Display/LED. This will allow the content to appear as if it is in a fixed point in space and the moving Screen is just a window to see that content.
This is separate from how a Display/LED handles the visual due to the Projector being fixed, so the render will look like the content is being cropped backed and forth, whereas on Displays/LEDs the content is just moved past the end of the texture. - Check off if you want the content to follow the Screen as it moves around. This will do exactly as described, make the output show the content moving back and forth with the Screen.
This is separate from how a Display/LED handles the visual due to the Projector being fixed, so the render will make it look like the video itself has movement that happens to follow the Screen movement.
- Check on if you want the content to be “revealed” by the Display/LED. This will allow the content to appear as if it is in a fixed point in space and the moving Screen is just a window to see that content.
WARNING
In can occur that when changing this setting back and forth that the perspective will be misaligned with the Screen due to a conflict in the incoming tracking data and the perspective location.
To fix this, check off tracking, use the Reset All Perspectives button to snap the perspective back onto the Screen, then move the eyepoint back to its intended location (By default 5 meters in front of that Screen's position).
As mentioned, the above setting will apply for all the Layers being used on the corresponding Moving Screen.
If there are certain Layers you would like to not follow the setting while it is on, you can go to any Layer's Setup tab and under the Render Properties section check on the Ignore Perspective Transformation from Direct API setting.
Any Layer with this setting on will act as if the Perspectives Follows Screen Positions setting was off, then act according to the previous list of affects.
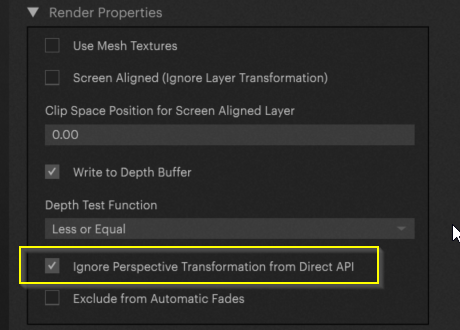
This setting can be set for a whole timeline as well:

The tracking data is transmitted with every layer, regardless of whether it's needed or not.
If there are too many layers, too many messages are sent, and they can no longer be processed.
However, you often only need it for a few layers. That's why this option is available.
NOTE
While the Layer is being used with Direct API on a Screen, it will also ignore other various settings involved with Layers. Such as one of the Big Four being the Origin setting, changing this will not move the content in any way until the Tracking Module is uninit().
Lastly, the setting Screen Aligned (Ignore Layer Transformation) in the same location can also be used to overwrite any of the settings above and force the content to stay attached to the Screen, just note depending on other Layer settings this could cause odd visuals.
Dynamic Softedge
One last section to take a look into is the Dynamic Softedge features on Projection Screens when they are moving.

NOTE
Information is being gathered for more clear/exact differences between the Dynamic Softedge settings, will be updated in the future.
There are a variety of settings in this section:
-
Use Dynamic Softedge: This checkbox will turn on Dynamic Softedge calculations which are rendered with the Projector/Screen position and set Settings.
-
Orientation: Decides how the Engine should generate the Softedge, if only using projectors which are placed Horizontally to one another, only Horizontal should be selected. If only using projectors which are placed Vertically to one another, only Vertical should be selected. If you have projectors in both configurations at once, then Horizontal and Vertical should be selected.
It is not recommend to always just select Horizontal and Vertical due to it using more calculations than one of the individual options.
WARNING
The following settings will not take affect until a Mapping Update is made.
If performance allows during programming, you can have Apply Automatic Mapping Updates in the same Dynamic Screen Setup section checked on to give real time updates for faster programming. Keep in mind you may experience unexpected jittering and visual issues if performance is exceeded, which is why during showtime/once Dynamic Softedge is setup to your liking that it is then checked off.
Otherwise, for manual updates you can use the Trigger Mapping Updates buttons.
-
Smoothness: Will change the fade length. The higher a value, the longer the fade will cover the Output.
-
Gamma: Affects the strength of the fade along its length. The lower a value, the darker the fade will be in total starting from the edge of the fade.
-
Angle Weight: Moves the weight of the fade towards the angle between the Projector Outputs. The higher the value, the more weight given to the angle vs the selected Orientation edge.
-
Distance Weight: Pushes the area of the full black edge on the fade. The higher the value, the farther from the edge the full black will reach.
-
Limit Angle: Changes the fade's edge from being a flat edge to a given angular curved edge. The higher the value, the more the edge will wrap around the Output.
- Limit Power: Tied to Limit Angle involving the new curved edge's strength. The higher the value, the stronger the edge's fade will be.
Control Connection
For the full Tracking Module setup and workflow please reference the Tracking Modules article.
Once you have the other tabs settings correct and your Tracking Actions created, connect the Action sending the relevant data to the corresponding Screen's Action.
Below this is done after pulling the Screen out to its own Module for easier visualization. Note that in this case just Position and Rotation are being sent, if Perspective Position was also being sent, such as from Stage Precision, the Action setPosRotAndPerspectivePos() would need to be connected to.

WARNING
Do not use basic data input, such as a Generator Module like Sinus, because this will result in jittery/unsmooth movement and cannot be resolved. To get smooth movement you must use a Tracking Module that goes through the Direct API.
Special Considerations for Screen Tracking in 2D
When a tracked screen moves in a Screen Group configured for a 2D perspective, the content may drift slightly on the output even though it is intended to remain fixed in space. This behavior is usually caused by a scale mismatch between the physical screen dimensions in meters and the 2D perspective dimensions in pixels.

Why Content Drift Can Occur
Tracking systems send screen positions to PIXERA in meters. When the tracking data is passed to the engine, a screen movement of 4 meters also moves the associated perspective by 4 meters.
In a 2D Screen Group, however, the perspective position is defined in pixels. If the physical size of the screen and the pixel size of the perspective do not use the same conversion factor, the screen and perspective movements will not match. The result is unintended content movement or drift while the physical display is moving.
PIXERA Unit Conversion
PIXERA uses the following internal conversion:
- OpenGL units are treated as meters.
1 OpenGL unit = 1 m1 px = 0.002 m1 m = 500 px
To calculate the matching absolute perspective size, divide the physical screen size in meters by 0.002:
Perspective size in pixels = physical screen size in meters / 0.002
Apply the conversion to the relevant screen dimensions:
Perspective width  = screen width in meters  / 0.002
Perspective height = screen height in meters / 0.002
This means you will need to adjust the perspective size of the screen/display manually.
Tip
Link to maintain aspect ratio can be activated for simplification

Once you have adjusted it, you will need to move the perspective position to the desired base position.
If prompted whilst moving the perspective, set the layer origin to ‘absolute’

Example
For a screen with a physical height of 4 meters:
4 m / 0.002 m/px = 2,000 px
The corresponding 2D perspective height should therefore be set to 2,000 px. This aligns the scale used by the perspective with the meter values received from the tracking system. A tracked movement of 4 meters then corresponds to a perspective movement of 2,000 pixels, preserving the intended 1:1 relationship between physical movement and perspective movement.
If the content no longer fits the perspective perfectly as a result, you can simply use ‘Fill Home screen’ to scale it correctly again. You don’t need to worry about losing pixels, as this is calculated internally in OpenGL units, so there is no loss of quality.

Recommended Setup for 2D Tracking with Three-Dimensional Objects
- Determine the physical width and height of the tracked screen in meters.
- Convert both dimensions to pixels using the factor of
0,002. - Set the 2D perspective to the calculated absolute pixel dimensions.
- Verify that the settings described above are set.
- Move the screen through a known physical distance and confirm that the content remains stationary at the intended output position.
Using 3D Mode for 2D Tracking
Screen tracking for 2D Screens can also be used in 3D mode. For a flat screen or display without depth, this can work without visible perspective distortion.
For curved screens or 3D objects with depth, the result depends on the perspective and eye point. As the object moves, surfaces at different depths are rendered from different viewing angles, which can introduce perspective distortion. In this case, the eye point must represent the intended viewing position accurately and is therefore not recommended.
Choosing Between 2D and 3D
- Use a 2D Screen Group when the tracked object is moved only in two dimensions and a flat, distortion-free content representation is required. Make sure the meter-to-pixel conversion is applied to the perspective size.
- Use 3D mode when the geometry, depth, or viewing angle must be represented correctly. For curved or three-dimensional objects, configure the eye point and perspective carefully and expect the image to change according to the viewer's perspective.
If the screengroup is set to 3D and the perspectives are reset, they automatically correspond to a 1:1 meter representation.
Pixera 26.1 R 39 | 3 September 2026 | C.L. J.B.