 Contact Us


In a real-time environment, a Timeline may be set to actively play back or be paused.
However, unlike video editing applications, in PIXERA the Resource of a Clip can act independently of the Timeline transport controls (i.e. Play or Pause). PIXERA offers seven Play Modes for how a Clip can behave.
To change the Play Mode of a Clip, you have to select the Clip in the Timeline. Then inside the Inspector on the right side, a dropdown of Modes can be found.

Lock to Time
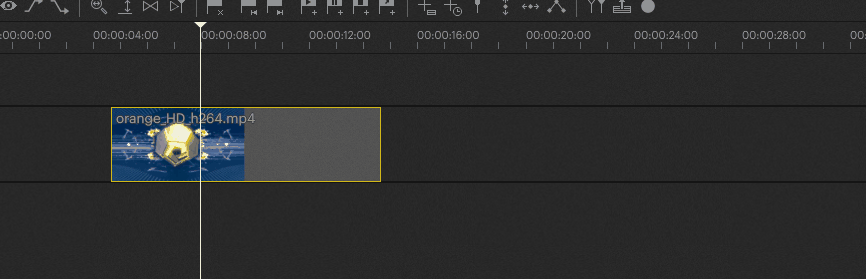
Lock to Time is the standard setting of a Clip. In this setting, playback of a Clip is synchronized with Timeline playback. When Timeline playback is paused, the content of the Clip is also paused.
If the duration of a Clip on the Layer was extended, or an Inpoint/Outpoint is made on the Clip, the video is automatically looped from the beginning until the Clip is left. The light gray line in the container shows the original length and thus when the video will start over when hitting that point.
Lock to Time|No Loop
When set to Lock to Time | No Loop, the Clip will play its Resource to the Outpoint while playing back with the nowpointer.
When it reaches this end, it will continue to show the last frame only and not loop from the beginning again. This occurs over the entire rest of the Clip, no matter how long it is made.
Free Play Once
Free Play Once has the Clip play its Resource to the Outpoint independent of the Timeline playback (i.e. it will playback whether the Timeline is playing or paused), as long as the Nowpointer is inside the Clip.
When the Resource reaches its end, it will continue to show the last frame, and will only playback from the beginning again when the Nowpointer leaves and re-enters the Clip.
Free Loop
Similar to Free Play Once, in Free Loop mode the Resource will be played back independently of Timeline playback. However, in this case the Resource will loop indefinitely between the Inpoint and Outpoint for as long the Nowpointer is inside the Clip.
Moving the Nowpointer out of and back into the Clip will reset the Resource playback to its beginning.
Show Inpoint
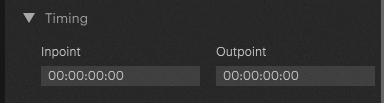
Show Inpoint will only render the frame set as the Resources Inpoint for as long the Nowpointer is inside the Clip. The option to change the Inpoint and Outpoint can be found in the Inspector after selecting the Clip, under Timing.
Inpoint with a timecode of 00:00:00:00 is the default value to display the first frame of the Resource (start frame of Clip).
Outpoint with a timecode 00:00:00:00 is the default value to display the last frame of the Resource (the end frame of the Resource duration).
NOTE
The Inpoint and Output can be set via Keyframes, so these can be changed over time on a Clip.
Free Play Once|Ping Pong
Ping Pong is a type of Play Mode which will play the content forward and then backwards before completing. Free Play Once|Ping Pong acts the same as Free Play Once in that it will only play the Resource through once, then freeze on its final frame.
In the case of Ping Pong, this means the final frame will be its first frame, since the Resource will play forward and then backward ending where it started.
Warning
Ping Pong plays the Resource used backwards. This works the same way as setting a Clip's Speed to -1, in that the Codec is decoded by the Engine in reverse
As with Clip Speed, not all Codecs support negative speed. For example, Codecs like H264 and H265 perform very poorly when this is attempted.
The Standard Content is H264 content, so in this case it is not recommended to test the Ping Pong modes with the Standard Content as you will have stuttering playback on the Output.
Instead, it is recommended to use NotchLC/Transcode the Standard Content to NotchLC when wanting to test Ping Pong. For other Codecs, it is recommended to test with it to make sure playback remains smooth.
Free Loop|Ping Pong
Free Loop|Ping Pong acts the same as Free Loop in that it will continuously play the Resource in a loop until the Nowpointer leaves the Clip.
In the case of Ping Pong, this means the Resource will play forward, then backwards, and forwards again continuously in a loop.
Warning
Ping Pong plays the Resource used backwards. This works the same way as setting a Clip's Speed to -1, in that the Codec is decoded by the Engine in reverse
As with Clip Speed, not all Codecs support negative speed. For example, Codecs like H264 and H265 perform very poorly when this is attempted.
The Standard Content is H264 content, so in this case it is not recommended to test the Ping Pong modes with the Standard Content as you will have stuttering playback on the Output.
Instead, it is recommended to use NotchLC/Transcode the Standard Content to NotchLC when wanting to test Ping Pong. For other Codecs, it is recommended to test with it to make sure playback remains smooth.
Youtube
Also checkout our video tutorial on Youtube for a visual on some of the different Play Modes.
PIXERA 25.2 R 12 | 15 December 2025 | CL