 Contact Us


Settings for Clips can be found in the Inspector after selecting one on the Timeline.

Media Thumbnail
A thumbnail of the Resource being used in the Clip is displayed at the top left.
Clicking on this thumbnail will jump the Resources tab in the Library to that Resource as well as have it be selected to display its information in the Inspector.
Resource Information
Beside the thumbnail will be some base information on the Resource it displays. That includes its duration, fps, resolution, and the Resource's name.
Time
The Timecode of the Clip's starting position on the Timeline is shown under Time. Keep in mind that the timecode is in HMSF (Hours:Minutes:Seconds:Frames).
Note, that this value can also be changed via entering another value or clicking the time and dragging the mouse up or down, with the Clip on the Timeline moving accordingly.
Tip
When manually entering a value for any timecode input box, you can either enter the amount of frames (50 for 50 frames), or you can enter a shorthand.
The available shorthand's are listed below:
- 100 = 1 second = 00:00:01:00
- 1000 = 10 seconds = 00:00:10:00
- 10000 = 1 minute = 00:01:00:00
- 100000 = 10 minutes = 00:10:00:00
- 1000000 = 1 hour = 01:00:00:00
- 10000000 = 10 hours = 10:00:00:00
Warning
The timecode's amount of frames is based on the set FPS for the Timeline that Clip is inside. This is important due to deciding how entering frames works.
If the Timeline is at 60 fps, and 30 is entered, the final timecode would display 00:00:00:30
If the Timeline is at 60 fps, and 60 is entered, the final timecode would display 00:00:01:00, which is 1 second, the same as 60 frames on a 60 fps Timeline.
Duration
Duration displays the timecode of the Clip's total duration on the Timeline. Keep in mind that the timecode is in HMSF (Hours:Minutes:Seconds:Frames).
Note, that this value can also be changed via entering another value or clicking the time and dragging the mouse up or down, with the Clip on the Timeline moving accordingly.
Tip
If wanting to find the timecode that the Clip ends at, this would be found by adding the previous Time value to this Duration value.
This can be useful in Control when wanting to use the end of the Clip for some purpose, such as adding dynamic cues.
Play Mode
The desired Play Mode of the Clip can be set here. There are seven different Play Modes: Lock to Time, Lock to Time|No Loop, Free Play Once, Free Loop, Show Inpoint, Free Play Once|Ping Pong, and Free Loop|Ping Pong. For more information on the Play Modes, please see Clip Play Modes.

Clip Timecode and Parameter Graph
The graph shows the Clips timecode on the Timeline and allows you to move the Nowpointer in this location, as well as add and modify keyframes for various other settings, such as the Opacity and Volume Parameters.
To switch which of these is being looked at, you need to click on the dropdown settings for the corresponding Node/Parameter found below the graph.

Record Mode is also available in the top right. For more info on this feature, please see DMX Input Recording.
Visibility and Audibility
The Visibility and Audibility section allows you to modify the Layer's Opacity and Volume, which will become a Dominant Value for that Parameter (Shown by the diamond turning yellow). If wanting to make that value be set only for this selected Clip, you can click the yellow diamond to save it at the Nowpointer's position inside the Clip.
You can also mute/unmute the Opacity and Volume of the Layer with the top right buttons.
Position
The Position section allows you to modify the Layer's Position (X, Y, Z) values, which will become Dominant Values for those Parameters (Shown by the diamonds turning yellow). If wanting to make that value be set only for this selected Clip, you can click the yellow diamond to save it at the Nowpointer's position inside the Clip.
Rotation
The Rotation section allows you to modify the Layer's Rotation (X, Y, Z) values, which will become Dominant Values for those Parameters (Shown by the diamonds turning yellow). If wanting to make that value be set only for this selected Clip, you can click the yellow diamond to save it at the Nowpointer's position inside the Clip.
Size
The Size section allows you to modify the Layer's Size (W, H, D) values, which will become Dominant Values for those Parameters (Shown by the diamonds turning yellow). If wanting to make that value be set only for this selected Clip, you can click the yellow diamond to save it at the Nowpointer's position inside the Clip.
Color Correction
Color Correction holds a variety of settings, that once changed, will add the corresponding Effect to that Layer and allow its values to be changed by the Elements in the dropdowns.
Keep in mind as with the above, the changes are for the entire Layer until the Parameter is saved by clicking the yellow Dominant Value diamond.


Brightness Contrast Offset, the ColorCorrectionBCO Effect:

Hue Saturation Value, the ColorCorrectionHSV Effect:

CDL - Slope/Offset/Power, the ColorCorrectionCDL Effect:

It is also possible to add a LUT file to individual Clips for changing their Color Transformation.

Timing
The Timing settings will change how the Clip plays back when entered. Each setting is used no matter the Play Mode selected.

Inpoint
Inpoint defines the timecode of the Resource inside the Clip that will be displayed at the start of the Clip. Keeping this at 00:00:00:00 will play the media from its rendered beginning. Any value higher than this will then never playback the frames before it, including during a loop.
Outpoint
Outpoint defines the timecode of the Resource inside the Clip that it will stop rendering to. Keeping this at 00:00:00:00 will play the media to its rendered end. Any value higher than this will then never playback the frames after it, including during a loop.
Due to requiring at least one frame to be specified, the Outpoint must be set as 1 frame or greater than the Inpoint if its not set to 00:00:00:00.
Speed
Defines the speed at which the Resource inside the Clip will playback at. This is a multiplying factor, so a value of 1 means the media will play at its native framerate. Anything between 0 and 1 will slow down the media, below 0 will reverse the media's playback, and above 1 will speed up the playback.
Warning
Not all Codecs support negative speed. Negative Speed means the Codec is decoded by the Engine in reverse, to which Codecs like H264 and H265 perform very poorly when this is attempted.
It is recommended to use NotchLC when wanting to use a negative Speed value, or to otherwise test whatever Codec is being required to make sure playback remains smooth.
The Animate checkbox allows you to have Keyframes made from the Speed value to smoothly transition between each other. With this off, the Speed will snap to the new value when the keyframe is reached.
Lastly, there is a Speed Factor slider at the bottom. This allows you have a quick way for changing the Speed when having the Play Mode set to a looping option, like Free Loop.
Blend Frames
Blend Frames decides if a slower speed will then create interpolated frames to blend out the media. With this off, it is possible that the playback can look choppy. With this on, the Engine will generate frames between those that exist, allowing the media to smooth out at lower speeds.
Warning
Interpolation of Frames is a demanding process due to the additional calculations needed. Depending on the project scale, it is recommend to test performance on the system when needing to decrease the Speed value while also having Blend Frames on.
Below is a visual on how Blend Frames works, as well as how changing Speed works in general.
The top row shows the original speed. The center shows that without blending activated, the new frames needed for the timing are duplicated, which can lead to the choppy visuals. The bottom shows that with blending activated, the missing frames are a combination of the previous and next frame, creating a more smooth change over time.
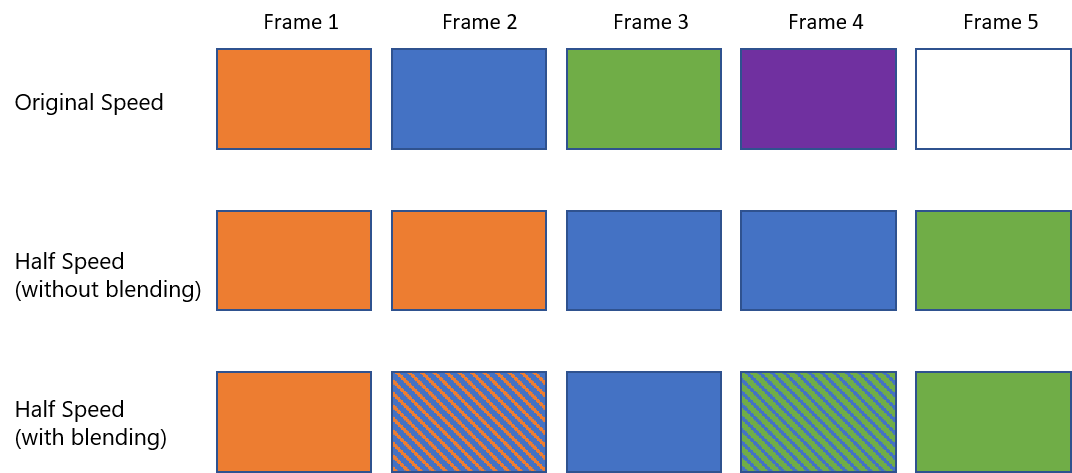
Blend Width Factor in this case then decides how many interpolations are made between the frames. The Default of 1.0 points to the above where one frame is created between each. 2.0 for example would add exactly two frames between each. A decimal like 1.5 would equal this out by having some with one frame between, while others would have two.
Blending
Lastly there is Blending. Here the Clip can be modified to affect Clips below itself instead of just displaying its content as is.

By default the Mode is set to Standard, meaning the Resource in this Clip will playback as it was rendered. Setting it to something like Multiply will have this Clip now multiple the Resource inside, with any other Clip's Resource played below it on this Timeline or within other Timelines, at the same position and Screen Group in Inner Compositing.

PIXERA 25.4 INTER 70 | 16 December 2025 | CL